Here I am revisiting the quilt I shared last Wednesday made from the beautiful
Peyton Collection by Windham Fabrics. I was sent a bundle of fat quarters. I love the challenge of having a limited amount of fabric and setting out to make something bigger than a pot holder or place mat!
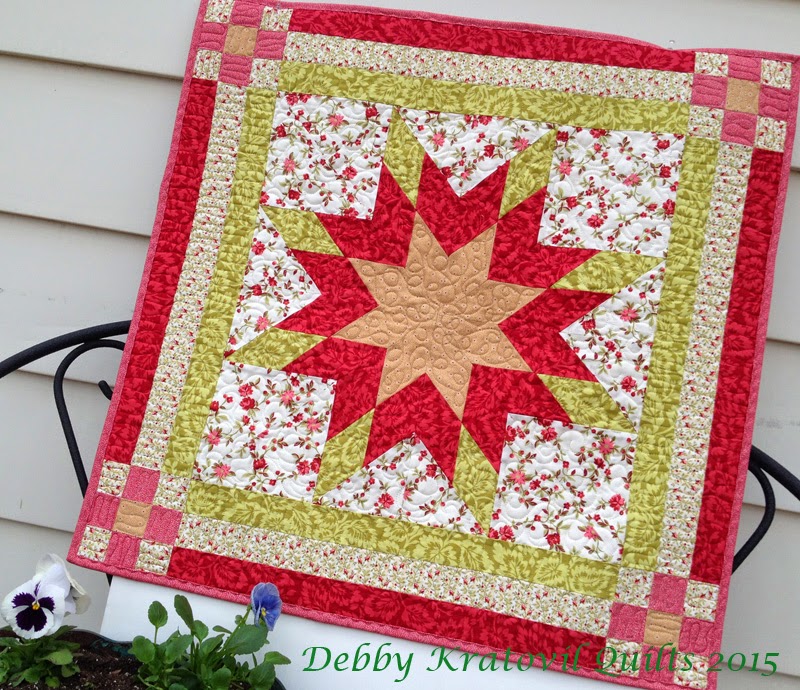 |
| Peyton's Star. 28" x 28" |
This is not meant to be a pattern, but general instructions on my process.
This is a FAT QUARTER FRIENDLY quilt! For the 19" center star, I used one fat quarter of:
-- Red
-- Green
-- Khaki
-- Large scale floral print
For the borders I used two more fat quarters (light red floral print and the light red blender) and a few scraps from the star fabrics.
Remember, this Lone Star has NO y-seams. Everything is straight seam sewing!
The fabrics again:
I selected the colors over on the right for my quilt.
So, how did I make that 28" x 28" Lone Star quilt from just fat quarters? I'm glad you asked!
I am using my GO TO Lone Star pattern, which makes a 19" (approximately) block. You can get the pattern for this at my Craftsy shop (
Storybook Americana Lone Star, also by Windham Fabrics)
I first decided which fat quarter would be the Lone Star background. I used the larger scale print with the red and green flowers.
My Lone Star is made of eight Four Patch Diamonds. I cut 2-1/2" strips of the red and the khaki print and the green print. Using the 45 degree line on your ruler, slice off the left side of the 2-1/2" green strip (see below).
 |
| Trim the left side to 45 degrees using your ruler |
Now add the red strip to the top and sew with 1/4" seam. Press toward the red fabric:
 |
| Sew these two strips together |
Repeat for the red strip and the khaki strip. Again, press seam toward the red fabric:
 |
| Trim khaki strip and add the red strip as shown |
Now you trim the red strip at the same angle as show below. Notice that the 45 degree line on your ruler runs along the seam line.
 |
| Trim red strip even with bottom strip on both strip sets |
Now make cuts every 2-1/2", working along the CUT edge and your ruler. DO NOT - I REPEAT - DO NOT USE LINES ON YOUR CUTTING MAT. Why do I say this? Because too many quilters use those lines by habit and I've seen an entire quilt destroyed by a student who made this cut using the 2-1/2" line on her mat. Very sad indeed! Always use your ruler to measure!
 |
| Cut units 2-1/2" wide |
Cut until you run out of fabric. You will have to make two strip sets of each color group.
 |
| Continue cutting every 2-1/2" |
VERY IMPORTANT NOTE: It is crucial that you get an accurate 1/4" seam. We are working with bias edges. We are working with an Eight Pointed Star grid. You cannot afford to get wobbly seams, have irregular seams, or press too heavy with your iron. If in doubt, practice your 1/4" seam and make a sample unit or two with scrap fabric.
You need eight units of the khaki and red; eight units of the green and red. One of each are placed together to make one Four Patch Diamond. Notice the placement of the colors. It DOES make a difference. The green and khaki diamonds have to be on the ends as shown:
 |
| Take care to place your patches as shown |
Now stitch them together and make a total of 8 Four Patch Diamonds. Press this seam OPEN. The sides of this unit have to be completely even. If you are not getting smooth, aligned sides, you will have to mark a 1/4" seam on one of the long edges in order to get these ACCURATE.
 |
| Make 8 of these Four Patch Diamonds |
Now it's time to add the background half-square triangles from the floral print. It is important to AUDITION these as shown. It is very easy to pick up the wrong triangle or turn the right triangle in the wrong direction, and then we know what happens then (out pops Jack the Seam Ripper!)
 |
| Lay your triangles out so they look like this |
Flip the small triangle over top of the Four Patch diamond, aligning them as shown below. These background triangles are cut OVERSIZED and then trimmed later:
 |
| Align triangles with tips and sides of the Four Patch Diamonds |
Stitch and press TOWARD the background fabric:
 |
| Press toward the background fabric |
Now add the larger triangles. You are now able to use the top and side straight edges of the unit to align this triangle:
 |
| Align as shown |
Stitch and press toward the background print:
 |
| Stitched and pressed. 1/4" seam at top tips of Four Patch Diamonds. They will NOT need to be trimmed |
Time to trim the oversized background triangles, using the sides of the Four Patch Diamonds. You may have to trim the sides of the small triangles, again using the long sides of the Four Patch Diamonds as your guide.
 |
| Again, use the 45 degree line on your ruler to help you get a straight cut |
Do this for all 8 of your units. Make these two by two as shown in the "AUDITION" picture above.
Time to sew them into the four block units. We are NOT stitching them as we auditioned them for the triangles. We are making SQUARES and not large triangles. Sew two units together along the sides where the large background fabric triangles are. Yes, you can see the seam (as opposed to a traditional Lone Star, but I'm out to feel successful and not stressed. And when it's quilted, you won't even be able to tell.
 |
| Sew two units together as shown. Repeat 3 more times. |
Press this long seam open:
 |
| Press long seam open |
Sew the four units into the center star:
 |
| Press seams open when you can for a flatter, smoother front |
OK. I'm running out of steam. Let's finish up so I can go take a nap!
I made Nine Patch units for the border.
 |
| Make 4 of these Nine Patch units |
Stitch as shown. Attach to quilt sides; press. Trim last two sets of borders even with the center, add a Nine Patch block to each of the short sides of the borders, press, and sew to complete the quilt top.
And here is the quilt again, finished. This was quilted on my HandiQuilter Sweet 16 sit down machine. I loved how quickly I was able to do it. I didn't do anything fancy, just some loops. I guess you could say I'm not so much a quilter as I am a looper!
 |
| Peyton's Star, quilted and bound with the remaining red blender |
I made the same size
Lone Star two years ago with the Rebecca Collection by Windham. The diamonds were a single fabric on one and a four patch on the other. Can I show you those?
Hope you enjoyed these easy steps. Check out my pattern at my Craftsy Store:
Storybook Americana Lone Star.


Hi Debby! This is Victoria, from Valencia (Spain). Remember the woman who left you a comment about quilting and Valencia and that you leave a comment in my blog asking me to contact you as soon as possible?. I replied to your comment by email, left a reply to you in my blog and now leaving another comment in your blog. I hope you receive this last one. Love!
ReplyDeleteI just love the Peyton collection, especially the purples! I went to the facebook site and commented and LIKED.... Thank you for what you do. Can't wait to meet you when you come to the Chambersburg Quilt Guild....
ReplyDeleteI checked out the Payton collection ,and left a comment.You sure make the lone star seem easy to make .i have always wanted to make one ,never did because of the YSeams.Now you have fixed that problem Thanks Debby
ReplyDeletechevaliermaryellen@yahoo.ca
Two stars - Lone and Feathered - are at the top of my to do list... your no Y seam method is so much better than struggling with that Y. Have visited the Windham FB page - of course the purples in the collection are the best!
ReplyDeletethanks so much for sharing your knowledge and for the opportunity to win.
I left a comment on the Windham FB page. I have never made a lone star quilt. For many years I only did appliqué quilts. It's only been the past couple of years that I've moved to more traditional pieced blocks, although all of mine have been made with white as the background fabric and the pattern can't be too traditional. 😊
ReplyDeleteHi Debby. The fabric is so pretty. Your project is lovely. I have done a couple of lone star quilts. They are so pretty.
ReplyDeleteI love your Lonestar quilt. I have never made one but now I've added this to my to make list. Thanks for the tutorial. b.j.day68@gmail.com
ReplyDeleteOn my bucket list. Thanks for a great tute!
ReplyDeleteI've made one lone star block and it used Y seams. Without the Y seams I can see myself making more.
ReplyDeleteI have made a Lone Star block before, but only using HSTs. I really need to try your method. suan430@cox.net
ReplyDeleteI've never made a Lone Star, but thanks to your great tutorial, I'd love to give it a try!
ReplyDeleteI've made a a Lone Star or two (well, two half done and one finished!) but I used the Y-seam method. You can bet I'm digging through my fat quarters and am going to give this a try soon! (Well, as soon as I finish my "Have a Latte" blog hop project!)
ReplyDeleteBeth @ Words & Stitches pbstrand@msn.com
I visited Windham Fabric's FB page and left them a comment. Thanks for the fantastic tutorial. I think that now I am game to try my first lone star.
ReplyDeleteOh Debbie, this is an ingenious way to allow those of us who are AFRAID of Y Seams to be able to make a Lone Star!! Being in the Lone Star State of Texas, I have ALWAYS wanted to make one but wasn't able to until now. Thank you for these directions. If I win the fat quarters, I will make my very own Lone Star!!
ReplyDeleteOh Debbie, this is an ingenious way to allow those of us who are AFRAID of Y Seams to be able to make a Lone Star!! Being in the Lone Star State of Texas, I have ALWAYS wanted to make one but wasn't able to until now. Thank you for these directions. If I win the fat quarters, I will make my very own Lone Star!!
ReplyDeleteI'm looking forward to trying your Lone Star method, Debby, although I didn't have much trouble with the 2 Lone Stars quilts I've made, both with Y seams: (1) lap size quilted with a combination of free-motion and machine decorative stitching, and (2) Christmas tree skirt with sashing between the blocks to create the hole for the tree trunk, so 135-degree seams instead of the more typical 90-degree Y; quilted by my favorite long-armer. Windham FB page is getting a bit of traffic from your blog today, Debby! (jane herbst at roadrunner dot com).
ReplyDeleteWhen I get home from vacation I will do April BOM & do the Lone Star which is new to me. I liked way you had us do Hex seams @SewingExpo last yr. so this should be great to try! thanks Debby
ReplyDeleteNot sure about email showing for you so here it is fullerpat51@gmail.com Again thanks Debby
ReplyDeleteLove those purples...thanks for the chance to win. And thanks for the tutorial. I've made a small lone star, but I had Y seams to deal with. This looks so much simpler!
ReplyDeleteI am not on facebook, so I couldn't comment, and that may disqualify me, which is okay. =) I had completely forgotten about this method! I did make an entire Lone Star quilt, even bought the ruler for sewing strips and cutting the diagonal sections. At least I used that one once! =) Thanks for the giveaway and the directions for doing this, even without my ruler.
ReplyDeleteSorry, not on Facebook but do love the Peyton collections. The reds are gorgeous. I want to make a Queen size lons star so badly but have always worried about the seams. Do you have a pattern available for larger sizes? Thanks for the tutorial.
ReplyDeleteHELLO,left Windham's a note! No, I have not made a Lone Star Block or project, but think I will! Thanks for the tutorial and giveaway!
ReplyDeletemsstitcher1214@gmail.com
I have never made a lone star. Yours is beautiful and looks fairly straightforward to put together. I will try your tutorial. Thanks!
ReplyDeletePlease click on the delaineelliott above for my email link.
I LOVE this collection! Purple is so fun to play with! But then again, so is blue, pink, green, red ...... I've never made a lone star, but I think with your directions, I'm brave enough. Thank you!
ReplyDeleteOk Debbie, where were you when a friend talked me into making a Paper Pieced Lone Star Block.....Love your tutorial with the diamond shapes and ease of sewing together...I love stars so now I must make this one...by the way that other lone star block...still a flimsy,,not backed or quilted...just sitting on my project board to someday get done......
ReplyDeleteWednesday finally got here so I can comment on your giveaway gift. I have tried a lone star, but never finished it. I should dig it out and give it another go. Love the purples just what I need to make a table runner for a great niece's bridal shower. Thanks.
ReplyDeleteI left a note on the Windham page. I've started a Lone Star. It's bigger, and I haven't gotten to the squares/triangles yet. I'm not sure if I'll figure out the no Y seam size blocks, or just go with the directions I have. Thanks for sharing the info.
ReplyDeleteDebby,
ReplyDeleteI love your quilts!!! I also let Windham know. I have never made a Lone star quilt but want to. You make it look easy. Thanks for the chance to win some fabric!!
Linda
I have never made a lone star quilt. I would like to though. Love those purple fabrics.
ReplyDeletesenstrings at yahoo dot com
I've never made a lone star (feather stars, yes) and this smaller version would be a great start. Thank you for sharing all your talent a patterns with us.
ReplyDeleteI left a message on the Windham page! Love your tutorial, too. I have made two different version of Lone Star blocks but not a quilt. The blocks were complicated enough! :)
ReplyDeleteSandy A
scotty4me39 (at) yahoo com
I've never made one. Yours is beautiful!
ReplyDeleteDebbie I simply love your quilt. I can't believe that you used such a small amount of fabric to make such a beautiful quilt. I adore the purple fabrics that you have for a giveaway, if I were to win I think I would try making a quilt similar to the one that you made. Be well!!
ReplyDeleteTerri
I've never made a Lone Star Quilt, but it's on my LONG list of future projects. Thanks for the tutorial Y seams are frightening
ReplyDeleteWhat a cool tutorial! I've never done a Lone Star, although I'm about to start a Judy Neimeyer quilt top with a Lone Star as part of it. But that project will have Y-seams--I can't wait to give this one a try without them and compare the two!
ReplyDeleteMy email is DLLLESMOM at Yahoo dot com.
I made a lone star using jelly rolls without Y seams. Love your tutorial.
ReplyDeleteFabric is very pretty! I've never made a LoneStar block -you have a really ingenious method of making one-will have to try this!
ReplyDeleteI visited Windham Fabric's FB page and left them a comment. I have always liked the Lone Star block but have never made one.
ReplyDeleteThe collection is so Springy! I am super excited about trying your Lone Star. I've always wanted to try that. jarvenpa1ne@gmail.com
ReplyDeleteI visited the facebook page and left a comment (as Michelle Olsen Sasak). I've never made a Lone Star block or quilt, as Y-seams are very overwhelming to me and I tend to stick to more basic piecing. I love your method and am bookmarking it for later use! Thank you!
ReplyDeleteI have not quilted a lone star as yet but would love to try one out now.
ReplyDeleteThanks for the giveaway!
merryorganic@gmail.com
I have not tried a lone star as yet but it is on my "must do list".
ReplyDeleteThanks for your post.
Thanks for the giveaway!
flaura@gmail.com
I have made a lone star as yet but your blog post is very inspiring.
ReplyDeleteThanks for the giveaway!
larslaura27@gmail.com
I haven't made a lonestar yet, but it's on my bucket list, and this little one would be a great way to try it out! Thanks for the great tutorial. I'm bookmarking this for s summer project. Your quilt is delightful!
ReplyDeleteit's a great tutorial and such pretty fabrics, purples are so growing on me this year. i've never made a Lone Star before and that's funny cause i'm in the Lone Star state but if i'm gonna make one this tutorial would be the one to use :)
ReplyDeleteNo, I've never tried a Lone Star although my aunt gave me a half-way started lone star quilt. i can't bring myself to get started on someone else's beginnings.
ReplyDeleteThanks for the great tutorial! I'm fairly new to quilting but have been sewing for 4 decades. The only quilts I've attempted so far were variations of basic squares.
ReplyDeleteWhat a great tutorial. It has been at least 20 years, maybe it's time to make another one and use your directions.
ReplyDeleteI have never made a lone star block, but these are beautiful!
ReplyDeletei started one, but it is still waiting to be finished.
ReplyDeleteI left a message on the FB page. I really like your tutorial. I haven't made a Lone Star block before but when I do I'll use your method! Thanks for the chance to win that gorgeous fabric!
ReplyDeletesarah123quilt (at) gmail DOT com
What a fab quilt. It looks stunning and the tutorial was great. X
ReplyDeleteI have never tried a lone star quilt due to Y seam fear! But I AM going to try it your way! Thanks.
ReplyDeletecork@pa.rr.com
These Peyton fabrics are AWESOME! I do Love the purples...would make something special for my purple loving Daughter too. :) Love the Lone Star ..but haven't made one .. yet! :)
ReplyDeleteLove the Peyton collection my mom would love the purples. Not a Facebook person either. But visited the website. Lone star is on my to do list. Will definitely use your way. Thanks. Drhodes9@cox.net
ReplyDeleteI really like the purples in the Peyton collection. I haven't made the lone star yet; just learning how to do 8 point stars, and yes, I'm doing them without Y seams. :)
ReplyDeletePeyton is truely beautiful. I will be creating my first lone star very soon as I have finally found a great tutorial
ReplyDeleteThanks for the tutorial; It makes it a little easier for beginners. I love the fabric in your giveaway.
ReplyDeleteBeautiful. I love this idea for avoiding Y seams.
ReplyDeletethanks for the tutorial. never sewn a lone star quilt before.
ReplyDeleteThank you for the tutorial on the LOne Star Quilt. I love it as I do all your tutorials. They are so wonderful and inspiring. I've never made a Lone Star Quilt before and I like how you shw doing it with no Y seams. My daughters and I took a few of your classes at the Cleveland Quilt & Sewing Expo in the past. Haven't been able to go the last couple of years but not for lack of wanting to go. We always looked for your classes. 2 of the classes we took were Batik Braids, & Sugar Loaf Jewels. I also bought since then the pattern for the Hexagon Spiderweb and the kit for the Mariner's Compass. Love what you do and the quilt projects you have. Now I'm looking forward to the OLone Star Quilt with no Y seams and a few of the others I've been receiving lately through my e-mails with you. Keep on Happy Quilting from me.
ReplyDeleteHi Debbie again this is just to be sure you got my e-mail address.
ReplyDeletepattymelt1956@yahoo.com
And thanks again.
The Peyton collection is gorgeous! No, I have not made a Lone Star block or quilt before, nor have I worked with y-seams. Having your tutorial with the super photos gives me the courage to give it a go. And, I love your little loops!
ReplyDeleteI love the Peyton collection! Wonderful colors and I am crazy about purple! I have never made a Lone Star block or quilt before and have not ever worked with Y-seams!
ReplyDelete