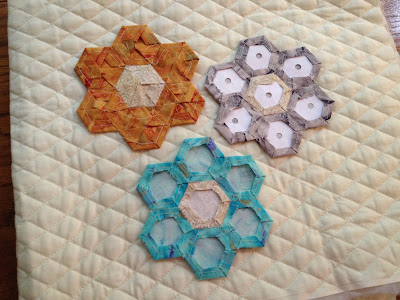
Last week I taught an enthusiastic group of quilters how to English Paper Piece. To be fair, many of them already knew what they were doing, but wanted to see if they could learn something new. And they did! I showed them a better way to baste the fabric OVER the card stock and not THROUGH it. This way I can remove the papers and not remove the stitching, which saves a LOT of time.
The first image (orange) is a finished block before I trim the fabric. What? I don't cut fabric hexagons? Of course NOT! I cut fabric rectangles that are at least 3/8" larger than the size of the hexagon. I punch a hole in the center of the paper hexagon (second photo) which does two things:
1. Gives me a place to put my pin to secure the fabric/paper together
2. Gives me a spot to stick a retracted pen through to "pop" out the paper.
 |
| Wrong side of my 3/4" Grandmother's Flower Garden blocks |
Once I have trimmed the fabric (as in the gray block above), things are neat back there and I can remove my papers. The basting stitches remain in.
The turquoise GFG shows what it looks like after I've removed the papers. Because I didn't stitch through the papers I'm able to reuse the papers; they haven't been weakened by stitches.
Here's a close-up of a GFG block with papers removed. The method for basting is to fold over the fabric and take a stitch in the corner folds, one at a time. You are NOT stitching through the paper; only through the fabric.
My favorite new hexagon size is 3/4"! I love working with those small hexies and have made quite a few blocks.
 |
| Various sizes of papers |
I've even taken it to another round! This is what it looks like before trimming the fabric.
 |
| Wrong side of a GFG block using 3/4" hexies |
And then trimmed:
 |
| Grandmother's Flower Garden with two rounds |
From the front:
 |
| 3/4" GFG with two rounds |
Another one with 2 rounds in process:
 |
| Work in progress |
So? What have I done with them? Cut larger hexagon backgrounds and then appliquéd them on. And I will not have any y-seams!
 |
| Wrong side of an appliquéd GFG unit |
Then I did this to six blocks and added some setting triangles . . .
 |
| Six hexagon blocks with green setting triangles pinned |
Press the triangles, and then I'll stitch a large circle. Then 7th center hexagon will be interfaced and then appliquéd over that center hexagon hole. No kidding!
 |
| Auditioning my hexagon ring |
Let's see the center hexagon again. I used a piece of interfacing (NON-fusible) and stitched 1/4" around the entire hexagon.
 |
| Hexagon stitched to interfacing |
 |
| Clip into interfacing so I can turn it |
Hexagon turned right side out. This will fit over the center hole!
 |
| Center hexagon |
Not a single y-seam! All straight seam sewing. Added 30 degree side triangles (gray floral) and borders. Isn't she sweet!
 |
| 20-1/2" x 23" |
I have done this multiple times with my GFG blocks and will share some more in the days ahead. My students from last week enjoyed seeing all my EPP samples and I loved giving them some inspiration.


So, if I am reading this correctly, you wait until you are done sewing all the hexies together into the "block" before you trim all the fabric. Is that correct? I am sure that would be a time saver.
ReplyDeleteHi, Susan. Yes, that is how I work. This way I can keep stitching all the hexies together in a rhythm. Once the block is made, whether one round, two rounds, etc, then I pull out my scissors and trim the backs to look like I started with hexagon shaped fabrics. Shhhh. No one’s the wiser that I started with quick cut rectangles!
ReplyDeleteOh what a grest way to set your flowers into a quilt. I already use the stitch fold method...now if only I can see myself making smaller hexies...
ReplyDeleteMost people stick with the 1" hexagon. I won't go smaller than that 3/4". I didn't think I would like that size but it grew on me! I have several other dozen just waiting for a home! Stay tuned. Thanks for stopping by.
ReplyDeleteDebby, I love how you do this! I have always cut squares and basted through the fabric (just like you). But using the hexagon background and triangles is something that I’m excited to try. I really can’t wait for your classes at MAQ retreat this summer.
ReplyDeleteHi, Tanya. I’m so glad you liked my post today. Yes, I will be sharing some of these ideas for using the GFG blocks with hexagon backgrounds! It’s not hard and there are no y-seams.
ReplyDeleteI see that you’re in my Friday class. We will be making that Pentagon Wreath with those 5 sided shapes. New things. Fun things. And more hexagons, of course!
See you soon,
Debby
Hi, Debby. I’m very excited for the opportunity to finally meet you! I took a class with Aby Dolinger and we used one of your techniques on the mariner’s compass. I emailed her about taking your classes at MAQ. She did want me to tell you hello. I took the class on Friday and Sunday because I’m really interested in new shapes of EPP.
ReplyDeleteTake care,
Tanya
Oh, what fun! I love the 3/4" size and have a large piece I've worked on for 40 years, now and then. Sometime, I will finish it. I used to sew through the papers, and still reused them over and over and over, but now I use the Bohin glue pen. It doesn't distort the fabric when I pull the fabric off the papers, which a regular glue stick does. It's more like Post-it note glue. No matter how one does it, I love EPP!
ReplyDeleteWhat kind of interfacing do you like to use for your EPP? I took your class a few years ago in Atl and I can't remember. Finally starting my grandmother's flower garden! Thanks!
ReplyDelete