Posts

Showing posts with the label Diamonds

Jewels - Old and New

Image
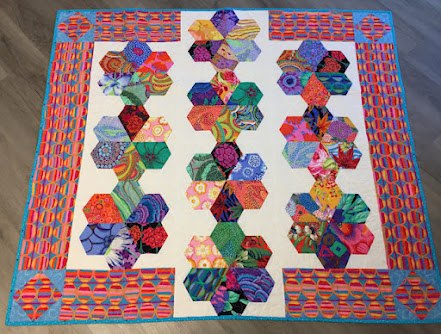
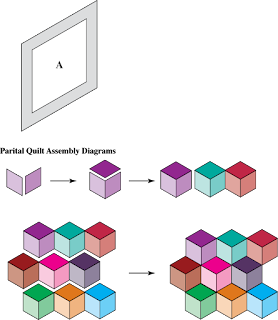
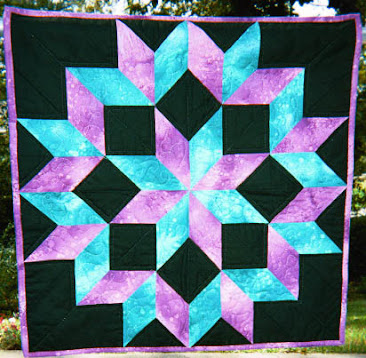
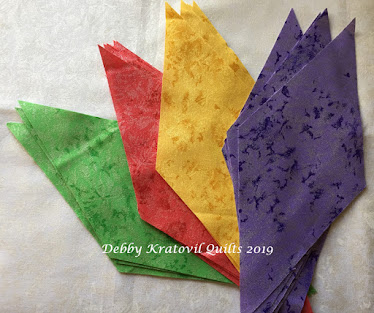
Well, I don't have any real ones to speak of. My wedding band has a few chips. I didn't get an engagement ring (my call). But I have FABRIC jewels and they are lovely! This is my  Scrappy Diamonds to Jewels  quilt which was a workshop for a few years. Scrappy Diamonds to Jewels : 48" x 52" Here is one I made almost 30 years ago where I incorporated some vintage crochet flowers and an awesome basket into the quilt. This now lives with my oldest daughter who loves things like this. Jewels begin as diamonds. You don't need templates. They are easy to cut using your standard ruler with 60 degree lines - any size. These were cut 4-1/2" from flat side to flat side. Taking the tip off one end (there is a formula for this!) Removing small triangle to make the diamond a jewel And my stack of jewels ready to be combined with small plain triangles. Then, I added some Kona Snow triangles to two short sides of each jewel and joined them in sets of 6. Of course, no y-seams...

Carpenter's Wheel Quilts

Image
I have made a few Carpenter's Wheel quilts over the years. In fact, one of them was in my suitcase that was stolen on a road trip in 2005! Never did get it back. If you see this, let me know . . . Carpenter's Wheel, made in 2003. 20" x 20" I foundation paper pieced the quilt above. It was a bit difficult in the way I drafted it, but it worked. NO y-seams! When it was stolen, a good friend of mine decided to make a replacement quilt so I could take it on the road teaching and lecturing (it was on loan). Joan was gracious to let me do that. Here is her quilt. She enlarged it with those extra mitered borders. Joan's Carpenter's Wheel She even allowed me to take it Spain when I visited my daughter in 2006. I arranged to have a trunk show with a local quilt shop (owned by an American married to a Spaniard). Here I am letting some ladies look at it up close. I saw a quilt online that mimicked  the Carpenter's wheel without the center star. I can draft anything, ...

More 60˚ Diamonds with Baby Blocks

Image
Looking back at my old art files from the late 1990s when I was an editor with Quilt Magazine, I see that when I discovered I could rotary cut diamonds and not use templates, I really took off with my quilt designs. Last week I shared several quilts using 45 degree diamonds; today I'll share some using 60 degree. Some you've seen before. Here's some art from 1997. This is the traditional way this pattern was created.  And a beautiful, vintage quilt done in velvets and silks. I try to avoid y-seams as much as possible. I love diamonds, but some of those diamonds can be split into two triangles and then it's all straight seam sewing! This is a traditional unit for Baby Blocks. There is a y-seam in the center.  Baby Blocks unit Don't believe me? Well, here it is from the back. Baby Blocks unit from back I was running out of fabric and had to seam some of the prints. Wanna see? Didn't keep me from using them in my little quilt! I combined them with a few others - an...

More 45 Degree Diamonds

Image
One more quilt using 45 degree diamonds - the Carpenter's Wheel! It has enjoyed a resurgence in popularity where the "diamonds" are created using half-square triangles. They don't really become diamonds, only parallelograms. This is my first Carpenter's Wheel quilt, made in 2001. A lone star in the center with radiating diamonds surrounding it. I actually paper pieced this, and it was a torturous time - but it worked. Carpenter's Wheel is a vintage, traditional pattern. Carpenter's Wheel It was stolen in 2005 on a teaching trip, along with 29 other quilts! I like to say it's hanging on that giant quilt rack in the sky. A friend of mine remade it for me - Joan did a beautiful job and I used it when I traveled and presented trunk shows. I have since returned it to Joan. Carpenter's Wheel by Joan Then, digging WAY back in my archives I came across Hearts and Swallows. This was made in 2001. I had to do a bit of fabric manipulation to make those diamon...

One More Hexagon Wreath and Stars

Image
I love to revisit some of my workshop samples and try to empty the box of blocks and parts. I made a few quilts using my Hexagon Wreath and Stars pattern and had several blocks in process that begged to become a quilt. Do you remember this Dancing Christmas Mice quilt? I gave this away soon after I quilted it. Hexagon Wreath and Stars : 38" x 42" Here is the second quilt I finished earlier this week using the leftover blocks. As you can see, I had to get creative with the star parts. But, you don't think a little child will worry about the 2-color stars, do you? Of course not! I also had to use 3 different prints (from the same collection) for the borders and I pieced those. I only had fat quarters. I dare you to find the seams! Dancing Christmas Mice: 38" x 42" Here's a pic of how the diamonds are sewn to one hexagon. Then I made 6 of these. Here's a photo of the quilt center (first version). No y-seams. Hexagon Wreath and Stars center And the very fir...

Fairy Frost, Day 2

Image
I was taught early in my professional quilting career to "sew for the camera." That means to let the fabrics do the work so that viewers can see the various prints and want to BUY them! Magazines weren't published to entertain only; they needed advertisers to keep the doors open and that meant inviting fabric companies to come along for the ride (and pay for admission!) I have made the Flying Swallows quilt several times. It's currently a class I teach for the Sewing Expo. ( Next class is in Akron, Ohio .) The most recent version used Fairy Frost . Here are a few of the 45 degree diamonds I cut. Diamonds cut from Fairy Frost No - I did NOT use templates. Pull out your acrylic rulers and do you see those 45 degree lines that run along a diagonal? Yep! That's what I used!  Makes it very enjoyable for my students. I cut two different sizes of triangles from more Fairy Frost - and then BIG triangles from that dark blue. Now, what does it look like when put together? ...

Windham Wednesday with So Many Diamonds!

Image
Several years ago (2012) I received a lovely collection from Windham Fabrics called Addison. While I'm not crazy about browns, I did love the pinks and reds in the group. Addison by Windham Fabrics (2012) I set to work cutting a bunch of diamonds. I had something in mind. These are 60 degree diamonds. 60 degree diamonds cut from the Addison fabrics I let them sit for a few months as I had something else brewing in my head. There's always more than one quilt happening in my brain! This is an oversized Garden Maze block that I finally quilted last year! Don't you just love that butterfly fabric for the border? (It's not part of the Addison group). Garden Maze quilt I actually made two of them. Can you see the difference in the little squares near the corners? Yes, more butterflies in the borders. Garden Maze quilt #2 I then came back to those diamonds. This is my Seven Sisters quilt. It was a very popular workshop for a few years. No y-seams, of course! Seven Sisters Tab...

Technique Tuesday with First Frost by Amanda Murphy

Image
Yes, I know: it's English Paper Piecing Week. And I have a little teaser block I made with these lovely fabrics that I'm going to share so I can stay true to the week's theme. First Amanda's fabrics: First Frost by Amanda Murphy for Benartex. Her Cotton Shots are the solids shown here, too Here is my teaser block made from a few of these fabrics. The traditional name is Star Bouquet. I used a 1" hexagon center, six 1" jewels and finished off with 2" diamonds. This is one of my very favorite EPP blocks to make. Tomorrow I'm going to show the steps. And, yes, those little hearts are made from 2 jewels. Here's my Little Buddy in the garden helping me show my EPP blocks: In the garden with First Frost blocks And here they are on some splendid Grass Green Cotton Shot of Amanda's. Star Bouquet and 3 Little Hearts NOW for what I made using First Frost . I immediately thought of 60 degree diamonds (because that's one of my favo...