This is a repost from when it was shared on the Benartex blog site (no longer working). It's a technique I come back to again and again.
Liberty Garden is a beautiful collection of flowers and colors from 2017. I received all 33 of the skus, but I narrowed it down to just six for the project I had in mind.
 |
| Six fabrics chosen from Liberty Garden |
For this mini project, I decided to revisit some of my 3-D hexagons, yo-yos and prairie point flower leaves. First, let's see what I mean for the folded hexie! Then I think you'll understand my steps.
 |
| 3-D Folded Hexagon |
Other techniques begin with circles. Who can cut a perfect circle? Not me! Plus, there aren't any points of orientation with a circle. I like to start with a hexagon. These are easily cut using a multi-size 60 degree ruler. This is my Creative Grids ruler. I like to practice with construction paper. That way, if I make a mistake, it's only paper!
(The pattern for this will folded hexagon be included at the end of this post.)
 |
| Practicing with construction paper |
I cut a 5-1/2" strip of the first floral and folded it in half, with fold side down and raw edges at the top. This is approximately twice the height of my finished folded hexagon.
 |
| 5-1/2" strip folded |
Then I cut the folded fabric, aligning the 2-1/2" horizontal line at the raw edges. (2-1/2" is half the finished height of the 5-1/2" strip). Slice on both sides of the ruler.
 |
| Cutting the 5-1/2" strip |
Open it up and - magic! A perfect hexagon.
 |
| Perfect hexagon! |
Now, fold two opposing points into the center. Notice that the fold runs from two other opposing points. Press well.
 |
| Press two opposing sides |
Now, this gets tricky to show, but easy to do: Fold the bottom right point (in pic above) up to the center. Repeat for the top left corner, folding down to the center. Press. Sometimes I use pins to hold the folded fabric in place.
 |
| Next two folds |
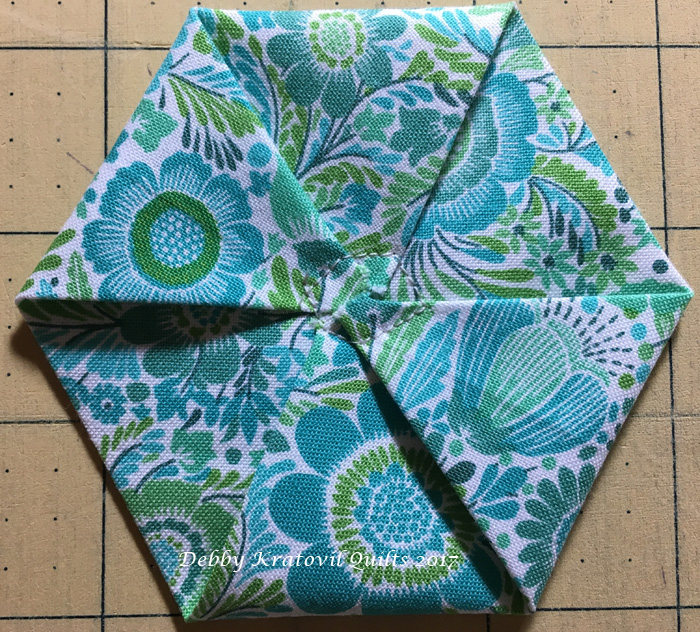
You now have two remaining points to bring to the center. Press and hand or machine stitch. The center stitching will be covered with a yo-yo (or a button).
 |
| Last two points brought to the center. Stitched down, |
Now for the yo-yo (circle pattern included in link below). Trace onto freezer paper, press to right side of fabric and cut out. (See. I told you I can't draw a circle well!)
 |
| Cutting circle of fabric for yo-yo |
Gather outer edge (1/4" folded under).
 |
| Gathering the yo-yo. |
Now for the prairie points. Cut three 2-1/2" squares. Now press them in half forming a folded rectangle. Bring outside points DOWN to the center so that ALL raw edges meet. Secure with stitching.
 |
| Three prairie points (will become my leaves) |
The stems of my hexagon flowers were made with a 2-1/8" x 20" strip sewn into a tube. Pull it right side out using a safety pin. Press flat.
 |
| Tube of fabric for my stems. |
Now let's see it all together:
 |
| Folded hexagon with yo-yo center |
The background of my mini was cut 10" x 12-1/2" (1705-84). The side border was cut 4-1/2" x 12-1/2". All other elements we cut and described above.
 |
| Liberty Garden mini |
This is a remake of a quilt I made almost 20 years ago and appeared in one of our magazines. I was using some Moda prints.
 |
| 3-D Folded Hexagons |
I've used this technique for other quilts. I'll share them sometime. Go get some construction paper and practice making some folded hexagon flowers and then make some using fabric!


When I compare the 2 samples you show, it looks like the second one (red) flowers are flatter, almost as if they were stitched or adhered to the fabric, whereas the first one (blue) they look more 3-D. Is that the case? I like the blue one the best, probably because I like blue better than red, but I also like the quilting design on the blue one better than the one on the red. Thanks for the pattern.
ReplyDeleteThank you for this! I like the way you did the flowers, and I love prairie points, though I make mine from strips more like your hexagon cutting than from squares. A friend taught me that, and it goes so fast and beautifully. This is a great design!
ReplyDelete