Do you have a pattern that you come back to more than once? It intrigues you and each time you make it you find a completely different outcome? That's how I feel about this Spinning Pinwheels.
Here's the first of 8 new blocks:
 |
| Kaffe Fassett Fabrics |
And the fabrics I used:
 |
| 8 identical squares cut 9-1/2" |
Let's see my previous posts. Click on this Chinoiserie link to see some amazing blocks - all so very, very different from each other!
My first one from 15 years ago:
 |
| Purple Kaleidoscope using 6 squares |
And my second one using $1 a yard fabric from Walmart (yes, 15 years ago Walmart had a fabric department). One piece of wicked kitties with pumpkins, frogs, bats and all sorts of other things created this awesome quilt! I cut 8 MATCHING squares (9-1/2") and then used my method as described below.
First, let me show you the 9-1/2" square I cut (8 times):
 |
| I cut this exact square 8 times |
My 8 block quilt:
 |
| Halloween Pinwheel |
And my 3rd one:
 |
| Using the Days to Remember Collection by Mary Koval: Tutorial Here |
Now let's see what I did with those Kaffe Fasset prints from above. Remember, I am working with 8 IDENTICAL squares of fabric that I cut from a large scale print. I used my 9-1/2" square acrylic ruler. This is NOT Bethany Reynold's method of Stack 'n Whack. This is NOT the One Block Wonders (because this predates that by 10 years). And you can see details of how to cut and stitch using the links above.
Back to those fabrics:
 |
| Everything is exact in each of the 8 squares |
And the holes I put in the fabric?
 |
| The fabric I chose and the square holes I left! |
Here are my blocks in process:
 |
| Stacks of 8 squares cut as shown (8 equal sized triangles) |
Now I pick up 8 identical triangles for ONE block:
 |
| One stack of 8 triangles |
I have to decide if they will spin left or right:
 |
| Spinning Right |
Or spinning left?
 |
| Spinning Left |
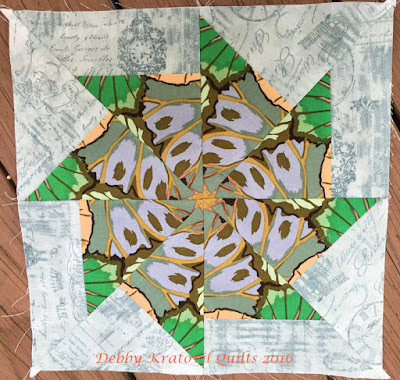
Now for my blocks, all 8 of them. Remember, these ALL came from that stack above, using a group of 8 triangles from the slice:
 |
| Block 1 |
Block 2:
 |
| Block 2 |
 |
| Block 3 |
|
| Block 4 |
 |
| Block 5 |
 |
| Block 6 |
 |
| Block 7 |
 |
| Block 8 |
I chose a light blue print for my background. You can find all of the dimensions and cutting information at the tutorial I shared back in 2013. Both
HERE and
HERE.
Can you imagine how awesome some other blocks will be using a large scale floral? You can't over think these things. As you can see, you really can't go wrong. And there's no way you can determine the amount of fabric you will need. But using a 9-1/2" square worked well. My blocks will finish to 11" and I will set them on point using the rest of that floral fabric for the side setting squares!


These are just so cool! Never made one - or a stack and whack.
ReplyDeleteWOWEEEEE. These are great. Very pretty. I never made one of these blocks or a stack and whack either. Never really liked that look till I see these.
ReplyDeleteI love these!!!!
ReplyDeleteThat was my pattern of choice when I did a SnW. I like your method a lot better. =) Thanks for sharing this. Although I don't ever like his fabrics, you found something attractive to do with one! I may have to make another one. There is a ruler out now - I saw it demonstrated on the shop hop last month - but who needs a special ruler we will use only once or twice, if at all? Thanks!
ReplyDeleteWow, fabulous.Love the fussy.
ReplyDeleteOh my..love this you again have given out a great pattern for a beautiful quilt that looks difficult, but you made the tutorials so simple to repeat....thank you....
ReplyDeleteWonderful blocks. Thanks for the how to.
ReplyDeleteThis is brilliant, and I can understand it! Thanks for posting.
ReplyDeleteLove these! It's always so much fun to see what results with different areas of the fabric
ReplyDeleteThat is really cool! Thanks for explaining how it works. I've seen these kinds of quilts before but have not made one yet.
ReplyDeleteHmmm. Looks like the time is now! Have fun
DeleteDo you always have the triangles going the same way? Or do you decide by what you like best?
ReplyDeleteAgile Jack, you can see in my pics above that you can audition your triangles to spin either right or left - or both ways. Then you begin stitching. Look at my samples with the brown fabrics. I wasn't paying attention and made them spin two ways, and if you don't look too close at where the blocks come together, you won't notice the funny joins of the two blocks.
DeleteOn my RxR shop hopping in Chattanooga today, I bought a fabric I hope will work for this. I'm anxious to try it out and see what happens!
ReplyDeleteAmazing!!! I loved the result you get.
ReplyDeleteYasmin