Posts

Showing posts with the label Handi Quilter

Sassy Mariner's Compass

Image
This is not just a Mariner's Compass, but it's Sassy! Why sassy? It has an extra ring of points that was supposed to fit but I measured wrong. I could almost hear them mocking me and my bad math. I made the top in 2011 and it waited 13 years to get finished! I had originally proposed it for my 3rd book, but Martingale didn't want it (so why quilt it?) Sassy Mariner's Compass: 36" x 36" This began with the center compass which is the basis for my Beginner's Mariner's Compass class. An easy 16" block with curves gentle enough for a novice quilter. Then the halo of points were supposed to connect to the center, but I didn't measure correctly and after I pieced all of them I discovered a 1" gap! Yikes!!! So, I had to add the red donut ring and voila! they all fit together. There is a lot of piecing, but because it's done on paper foundations, the points stay as points and my students were happy as clams to discover they had a compass they...

Recent Quilt Finishes

Image
I have been on a roll to try and make a dent in my stacks of unfinished quilts. I don't think I'll ever get them all done (I have at least 3 dozen or so). But here are 3 of my recent finishes (last week) that I enjoyed completing. All were quilted on my Handi Quilter Sweet 16. I made this quilt several years ago. I love making these tilt blocks using my own template set (Arrowheads) which are the same angle as Darlene Zimmerman's Tri-Recs. I've been making my tilt blocks for about 20 years. Cream and Sugar Tilted Squares: 47" x 51" Notice that I didn't use a single piece in the border. That's because I only had scraps from the remainders! I cut rectangles and squares and even extended the sashings into the border. I call this really making do! Next is a quilt that began in Paris, France in April 2001. My husband and I were on our way to Spain to visit our daughter who was studying abroad. I visited a quilt shop and bought the center toile pane...

My Diamonds Have the Blues

Image
I have a LOT of diamonds. Oh, not the shiny, rock, EXPENSIVE kind. I just have chips on my wedding band! I cut about 200 diamonds from some blue and green Kaffe Fassett fabric prints last year. Did I have a plan in mind? Not really! (Can you believe that?) A bundle of 6" strips that inspired me Here are some of the diamonds: Just some of the nearly 200 diamonds I cut I also used my basic 6" x 12" acrylic ruler. Really? Yes, really! Have you ever wondered about those 30, 45, 60 and 90 degree diagonal lines on those? They have a great role to play in quilting. You really don't need all those extra, superfluous templates that are out there. RHOMBUS? Whoa! What's with that bad word from math class? You can cut diamonds with your regular ruler. And that's how I cut these. (And saved myself about $15 for another useless template, I'm just saying . . .) Now, where was I going? First approach was to combine these diamonds with some 60 degree triang...

"Owl Be There" Quilt Finish

Image
I started this quilt in 2012 with a sweet collection by Benartex. You can read about my technique here: Owls Are the Bomb!  I made two of these blocks. 18" square with Owl Be There hexagons I used a method I've since abandoned (but it worked for me in this project). I cut out large hexagons of fussy cut owls in a tree. Then I turned the edges under as I would if I was English Paper Piecing. Then interfaced the center and machine appliqued the whole thing onto a large red square. Machine appliqued hexagons with red background trimmed I finally quilted this lovely quilt the other day. It is just one of the sweetest quilts I own. Can't wait to show it to my little granddaughter (3-1/2) this week. What do you think? Quilt from the back with those owls in the tree on a black background. Quilt from the back  And here's the quilt on my sunny deck. Owl Be There quilt I have to give a shout out to the three vendors who made this possible: Benartex (fa...

Love is Still in the Air!

Image
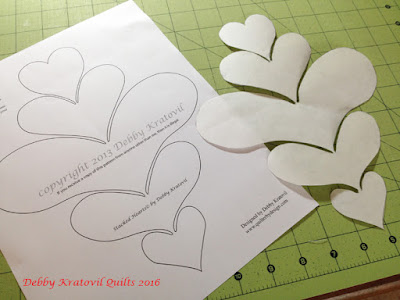
I pulled out my Stacked Hearts pattern and created a freezer paper stencil so that I could free motion quilt in a whole cloth manner. First, I traced the applique onto the paper side of freezer paper. Stacked Hearts appliqué pattern Then I cut it out and ironed it to the center of a shaded pink rectangle of fabric. Layered with Warm and Natural batting and a backing. Selected pink thread to blend with the pink. Iron freezer paper template to center What was my approach? First, I would stitch around the  Stacked Hearts  template. Then, I peel off the paper and free motion quilt INSIDE the hearts. Then, I quilted outside the shapes. Simple. Easy. It sure is better than following a stencil. Just a simple outline. The rest is just doodling.  Now the fun begins. Let's see the first quilt I made, under the HQ Sweet 16 needle: Stacked Hearts quilt being quilted. Yes, those are my humble machine quilting helpers And can we see the quilt, huh? Stac...

Machine Quilting Using Freezer Paper and Stencils

Image
I teach Beginning Machine Quilting for the Original Sewing and Quilt Expo and am always looking for new ways to keep the classes interesting. I have a LOT of small and medium sized samples that I bring with me and my students love to look at these for inspiration. My next show is Fredericksburg , Virginia. If you're looking for a little inspiration for machine quilting, consider joining me on Saturday October 3 in the Handi Quilter studio. I love to use simple shapes cut out from freezer paper. When they are ironed to a fabric, there's no need to mark the fabric in the traditional way (ie, with a pen, chalk, etc). The outside of the shape provides the sewing guide. What do I mean? First, tracing a stencil from one of my favorite quilting motif books, "501 Quilting Motifs." This is a compilation of stencils from Quiltmaker. An awesome book! I bring it to every class and highly recommend it. Tracing a pattern from 501 Quilting Motifs (Martingale) This was...

Sweet Baby Logs with Lotta Jansdotter's Stella Fabrics

Image
Today is Day Four (I think) of the Windham Fabrics blog hop using Lotta Jansdotter's latest fabrics. I chose the Stella Collection . Windham is giving away a fat quarter bundle of these fabrics, so stay with me! You may remember this collection from a few months ago. I shared how I made some 10" off center log cabin blocks with a fat quarter bundle. Let's see those fabrics again: Stella Fabrics by Lotta Jansdotter for Windham I showed the steps I used to make my blocks using two different sized strips. This was so much fun that I continued sewing until I literally ran out of fabric! Let's see what I mean  3" center square and 2" fat logs of a darker color  Then I added 1-1/2" light colored logs; then another round of dark "fat" logs Keep adding logs to two sides ONLY of the center square, which btw, is no longer in the center!!! When beginning with a light center square, you end with light colored strips I made 8...

Nature's Message from My Azaleas

Image
I think I got a message from God this morning about my color choices. I looked out my kitchen window at my jungle of a yard (if we owned this house we would nuke the backyard and start over). My azaleas are blooming and they are all in pinks and whites. Against the lush green backdrop I feel like I got an IM (instant message): "I love these colors. Go use them." Unruly and beautiful azaleas in my backyard I replied: I do use them and want to use them even more! Thanks for the confirmation. I made a super sized Dresden Plate quilt a few months ago using a very old border print. A border print with a Dresden Plate ruler? Why, sure! 12-1/2" height Vortex Ruler This Free Spirit border print is at least 10 years old, but still so pretty: Very girlie, very pink border print  And here is my pink and green quilt made using that border print: 30" center (I think); I used the 10" line on the ruler When you use a Dresden ruler (any angle) with a ...

Homemade Machine Quilting Grippers

Image
I am a HandiQuilter Ambassador and now use an HQ Sweet 16 sit down model  to machine quilt my quilts. I have SO MANY quilt tops as the result of making samples for my classes. Let me show you my ingenious take on expensive MQ grippers. When a quilt is larger than a small table topper, it becomes quite a chore to push it around under any machine's needle. I have used gloves. I have used the tips of rubber gloves (these are my favorite). I regularly spit on my bare finger tips. But I needed something with a little weight, the right size and some serious gripping power. Here is my solution: I asked my husband for some scrap wood about the size of my hands. He cut off the ends of an old wooden fence post he had in the garage. They're a different shape, but who cares? That's what we came up with. Small pieces of scrap lumber Notice that blue stuff. I bought it as the Dollar Store for - wait for it - a dollar! It is the rubber gripper stuff you put under your carpets ...