Posts

Showing posts with the label foundation paper piecing

I'm Dreaming of Snow Crystals

Image
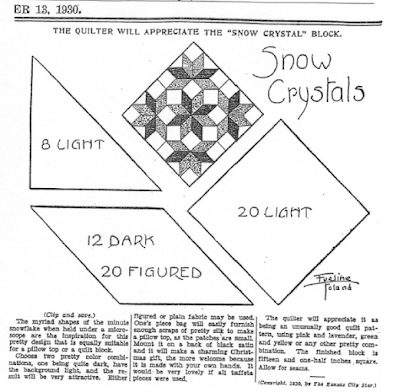
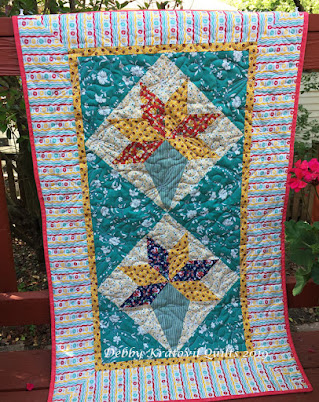
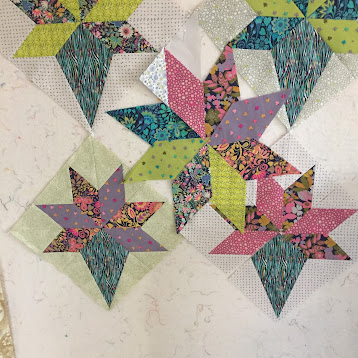
My Snow Crystals quilt was a hit Monday night when I spoke with a local guild, sharing my tips and tricks and quilter's shortcuts. Most of my quilts are vintage inspired and this was no exception. Take a look at the pattern page from the Kansas City Star in 1930. Would you like to use those templates? And sew y-seams? NO, not me! Page from the Kansas City Star Also notice that this is NOT four blocks but one. There are what seem to be 4 stars, but what's with the fifth star in the center? How did the designer think this up? Very clever, right? I made my own Snow Crystals quilt about 20 years ago - again, vintage inspired. Snow Crystals  - 24" block; 33" x 33" quilt Yes, these star units are paper pieced, but they can easily be rotary cut. I created a photo lesson for Quilt Magazine to go along with the quilt. (Yes, it says Windmill Star, which is another name for the star block). Here is the coloring chart which is a MUST for this pattern!  Snow Crystals  found...

Another Set of Quilt Twins

Image
I emptied another workshop box a few weeks ago and found some fun border fabric to set my last 16 blocks/units together. I amazed myself to find that the leftover blocks would make a pleasing center, even though they are not all of the same fabrics! Red, green and blue prints for those backgrounds around the spiky paper pieced blocks. Sunflower Garden: 47" x 47"  The first quilt I made appeared in my last book (Paper Piecing Perfect Points, 2013). I called it Katie's Garden. Katie? A friend or relative? No. Just the name of the fabric collection from Benartex! Easy enough! I made a smaller quilt using 4 units (for one block). This uses the Gazebo Collection by Windham. Simple workshop sample I added some borders and quilted it and gave it away to some little kid. Side borders are chickens. Top and bottom borders are cats. I sure hope they get along and don't fight in front of the little kid! Gazebo Garden quilt: 40" x 40" Now, let's see the first quilt I...

Starfish Pattern Sale (hard copy)

Image
I created a pattern and taught the Starfish workshop several times in 2022. Then I was left with 10 hardcopy patterns languishing in the box. I have retired the class and want to empty that workshop box! Pattern includes FREE postage (in USA). This is my unfinished workshop sample. I only had fat quarters so I had to get creative with my borders! The four 8" units are paper pieced, for a center block of 16". Starfish using Norma Rose fabrics: 44" x 44" These are part of my  Hanukkah Star Fish quilt . First, the Star Fish blocks (which are paper pieced). Paper Pieced  Star Fish  units I wanted to make those blocks again, but this time in Christmas fabrics. I printed and cut out my foundations. I pre-cut my fabrics and labeled them. Ready to go! That little chicken pin cushion is for Quality Control. Star Fish  parts ready to go! And here is where I went with it. Only 4 units this time. I decided to set it on point with those pieced setting triangles. No hocus-poc...

Paper Piecing Rattlesnakes

Image
 Oh, calm down. Not THAT kind of rattlesnake. Why would I do that to you? Some of this is a repost from 7 years ago because I've revisited my box of paper pieced rattle snake blocks this weekend. I rarely use anyone else's pattern (I don't get paid to do that), but I took a class 20  27 years ago with the Karen Stone paper pieced Rattlesnake pattern as the feature. I made a quilt out of flannels and it somehow fell into the hands of my daughter who used it for the dog to snuggle in. Want to see that? Original Rattlesnake quilt I used this pattern, published in 1996: Karen Stone's Rattlesnake pattern I have made a variety of units since that first quilt, some made with batiks. These will be stitched into background units to become 10" blocks: Batik paper pieced units This is what the unit looks like from the paper side after trimming: Single foundation Here are some of the batik blocks on my design wall. 10" Rattlesnake blocks being auditioned on my design wall...

In a Pickle (Dish)

Image
Pickle Dish gets its name from the cut glass dish used to serve, well, pickles! This was a popular 1930s pattern that was only for those who could stitch accurately and weren't afraid of templates and curved seams. You don't believe me? Ha! Pickle Dish pattern in Kansas City Star October 28, 1931 Here is my first Pickle Dish quilt using a collection by Windham Fabrics. I began this quilt in 2013 (can you say ELEVEN YEARS?) Traditional Pickle Dish Yes, I paper pieced those points in the arcs! There was no way I would attempt templates. Yes, this was made in 2013. Paper pieced arcs Here are some arcs I made the same way for another quilt. Pickle Dish paper pieced arcs Then I made one using some Kaffe Fassett fabrics. My second Pickle Dish quilt I made this into a workshop and made more and more samples. I have decided to retire the workshop, so that means I need to use up all the samples and throw away the storage box (you've seen those Chobani yogurt boxes I use to store my ...

7 Blocks; Square Quilt!

Image
I pulled a quilt from my closet that I stitched in 1996. It was made from several deconstructed swastika blocks a dear friend gave me. She knew I liked a challenge and we agreed that no one needs to be reminded of swastikas! Let's make something happy. I did just that. It was determined by quilt experts that the fabrics date to around 1890! I added some reproduction fabrics and actually hand quilted this. I think I'll hang it so I can truly enjoy it. It didn't like being cramped in my closet, anyway. 1890s Stars: 36" x 36". 8" blocks What I noticed on Sunday was that there are only 7 blocks, but the quilt is square! That means that I used spacer strips that equal four half-blocks in the top and bottom sides. Oh, I was so clever and I didn't realize it! Here's a recent quilt finish that I haven't shared before that, again, was able to create a square (3 blocks x 3 blocks) center using only 7 blocks. I had 7 panels that I surrounded with coordinatin...

Nosegay Quilts: Day Four

Image
I discovered a photo in one of our old magazines (Quilt Magazine, Spring 2005) of a vintage Nosegay/Bride's Bouquet quilt. I scanned it the other day and here she is in all her old time glory! Bride's Bouquet Quilt: 59" x 76" The blocks are 12" and when we ran the pattern, we included templates - lots of them (5 different ones!) Would you like to see what they look like? Nosegay Templates! Does this make you want to run and make one of these? Not me! If you would like to try your hand at making one of these quilts, I've just published a 12 page pdf in my Etsy shop. Go check it out and see all the photos! Old Fashioned Nosegay . NO templates, just easy foundations for paper piecing.  And I keep the fabric waste to a minimum; as you can see, the 45 degree diamonds can be cut (oversized) using your standard ruler! Cutting the diamond patches for foundation piecing Thanks for giving me the chance to share my Nosegay quilts!

Nosegay Quilts: Day Two

Image
I had enough fabric leftover from Monday's quilt to make a 2 block wheelchair quilt. They were just too pretty to sit in the workshop box alone. What do you think? 2 Block Nosegay quilt: 27" x 44" I donated this to my local guild's charity endeavors. Remember, a 12" block set on point is 17"! I made some more blocks with a collection by Windham called Solstice. Here are the units that are paper pieced and trimmed before joining together. Notice the base "cone". Units for one Nosegay block The cone utilizes a stripe and I needed to make sure it would be oriented correctly. I rough-cut the patches using an oversized piece of freezer paper. Rough cutting the cone base And several blocks: And my final quilt top. All I had for the blocks and center were fat quarters. I used a different collection for the outside borders. Solstice Nosegay quilt top: 48" x 48" I'll be back on Friday with my last 2 Nosegay quilts. Here's a teaser for one ...

Nosegay Week: Day One

Image
This vintage pattern was traditionally made using templates. I converted it to foundation paper piecing about 15 years ago. I look for the lines and the obvious units and go from there. What is the Nosegay, you may ask? Notice my latest blocks here on a design wall. Do they look like stars missing a point or two? Several Nosegay blocks in process Compare the star block below with those above. Yes, there are two star points replaced with a base cone. 8 Pointed Star (Lone Star) using the Solstice Collection by Windham Fabrics A traditional Nosegay block has inserted "buds" between the star points as you can see from this yellowed newspaper page from 1937. And an elongated cone. It is set on point. And look at those templates!! Here is one I found on Pinterest in real fabric. Let's see one of the first quilts I made using my foundation piecing of the block. I did take out those little inserts. This is from 2008. Old Fashioned Nosegay: 12" blocks. 47" x 55" qui...