I'm back with some more Winding Ways quilts. It's also called Wheel of Mystery. But, you may ask, besides buying a set of templates, how did someone think this up in the first place? How was this design formed way back in the Age of the Dinosaurs?!
First, let's look at a few blocks:
 |
| 10" blocks using shot cottons and Kaffe Fassett fabrics |
And an old quilt or two:
 |
| Appliquéd Winding Ways |
And another one. This appears in my 2012 Wall Calendar of Quilts (which has 13 quilt patterns). But I've also added it as a single pattern for this black and white (and rainbow) quilt, too. Check it out here:
EZ Winding Ways Quilt.
Now let's see how this block is created:
 |
| Simple Winding Ways block |
Take note of the colors. Each color in that picture above is part of a circle. Let's start with the first set of circles with that square. Draw a square. Now draw a circle twice the size. My square (X) is 2". My circle (2X) has a diameter of 4". Center them. Everything from now on is relative to the vertical and horizontal center lines of that square (X).
 |
| Centered 2" square and 4" circle. |
Now, let's add some other circles. Two red and two green squares. The two red circles are aligned as shown with the vertical line of the square. They meet at the center horizontal line. The green circles are aligned with the horizontal line and meet at the center vertical line.
 |
| Adding two red and two green circles |
Now we add two purple circles, with their tops aligned with the top red circle. Again, everything is relative to the vertical and horizontal lines of the beginning square (X).
And then we add our last two circles, blue. Now I want you to look only at the colors that appear in that square. Can you see it? Shezaamm! Holy Cow! We have a Wheel of Mystery block, don't we?
 |
| We have just drawn a Wheel of Mystery (Winding Ways) block |
And for those of you who love to color, here's a planning sheet. Now you can really see all those circles, can't you? This is SO WOW!
 |
| Winding Ways Coloring Sheet |
I have made several of these quilts. Some I've "cheated" with the technique and just simplified the piecing to create a single appliqué shape. That's what's going on in the little child's quilt in the 2nd picture above. And I did the same thing in that black and white quilt.
I've been working with a set of acrylic templates by John Flynn. They are accurate but there is curved piecing that insists on a perfect 1/4" seam. Sometimes I like to challenge myself. I absolutely enjoy making Winding Ways blocks with these templates. Here are a few I made as class samples a few years ago. To be fair, John Flynn's company laser cut the patches for my students so we could start sewing immediately.
 |
| 3 Block table runner |
And a Four Block wall quilt:
 |
| Each student had enough patches to make 4 blocks |
I have several more blocks stitched, just waiting for assembly inspiration.
Let's go back to those appliquéd blocks. I took some process shots last week. I traced my template (from the pattern for the
EZ Winding Ways Quilt above) onto freezer paper and cut it out full size. I applied lightweight fusible interfacing to the wrong side of the floral fabric. I did not choose fusible web because I don't like how stiff it will be and also because if the appliqué is a light colored fabric and the background square is dark, it really affects the color of the appliqué patch. I will be trimming away the background fabric from behind the patch.
 |
| Iron freezer paper template to right side of fabric |
Cut it out:
 |
| Cut out single patch |
Here's the wrong side with the fusible interfacing:
 |
| Wrong side of the Winding Ways patch |
Let's line it up on the background square and stitch it:
 |
| Aligning the applique patch |
Now, let's see the stitching on the back:
 |
| Yes, I used a simple zig zag stitch (and made a mess in that one section!) |
Now, for a second block and showing the trimming away of the background fabric:
 |
| Second block appliquéd |
And trimmed away:
 |
| Trim away the background. Reduces bulk |
A few more shots with the use of the templates:
 |
| Patches cut and stitched |
 |
| Ready for the next to the last seams |
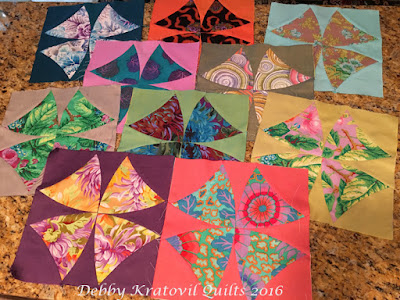
And those blocks again!
 |
| 10 of my 20 blocks |
OK. I'm exhausted! Hope you enjoyed the show and learned how to draft your own Winding Ways blocks. If you don't want to draft them, buy a
template set from John Flynn. They're very affordable ($9 for a 3-piece set, plus shipping). Or you can go for my
Wheel of Mystery pattern.


Great tuto and tips.Fantastic!
ReplyDeleteI think I prefer the machine applique way. =) Thanks for the tutorial. I could see the pros and cons of all the options, and that is always interesting for me!
ReplyDeleteLove it!
ReplyDeleteI just checked and I have your pattern! I'm going to start with a table runner -- I love applique ♥♥
ReplyDelete