Posts

Showing posts from October, 2020

Halloween Fun Motifs

Image
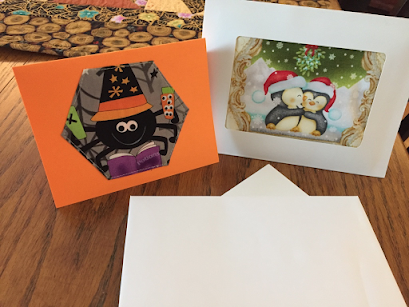
More fun ways with cards and fabric! This spooky spider is also from the Spooktacular collection (2014) and I made a simple card with my 6 year old granddaughter. She chose the motif, we centered it on the cardstock and I helped her sew it (by machine) to the card. We also test drove a window card (meant for photos) and she loved putting those cute Christmas penguins inside! Mixing Halloween and Christmas My Quilter's Block a Day Calendar (Martingale, 2004) has several blocks that have a Halloween theme for October. This is Pumpkin Vine, a variation on Drunkard's Path. Pumpkin Vine This is a set of 4 flying bats that I made for a Blog Hop many years ago. Don't you love those spiders?! Bat Wreath Here is a VERY old quilt I made about 20 years ago: Kitty in the Pumpkin Patch. Not living with me anymore; not sure if one of my 3 daughters has it or if I gifted it to someone. I'm sure it's happy that it can live outside my closet! Kitty in the Pumpkin Patch Sometimes (a

Halloween's a Comin'

Image
Halloween is not my favorite holiday, but I'm a realist. It was always a huge celebration in school when my 3 daughters were young, and of course, the candy was spook-taculer, so I went along with it. I've made several Halloween themed quilts, too (when you get paid to make these things, it gets a lot easier!) I pulled out some fabrics from 2014 the other day. They are from the Spooktacular Collection by Benartex (I've blogged about these before). I cut some hexagon motifs and paired them with some Windham Bedrock blenders. Spooky motifs fit into 2" hexagon shapes Here's the quilt I made back in 2014. I cut squares and then "snowballed" the corners. You can see the detailed steps at the Sew in Love with Fabric blog  (there was a contest, but of course, it's over). Here is the quilt quilted in 2015, which I've since gifted to one of my grandsons. Spooktacular quilt Yes, these fabrics are "old" but the motifs are so mu

Storm at Sea: Day 3

Image
Here we are at Day 3. I might have enough for one more day after this (but I'm still thinking!) This little quilt was made using some sample, pre-cut patches from John Flynn . His daughter Kate sent them to me to assure me that the hundreds (and thousands) of pre-cut patches for my workshop kits would be perfect. This is a small quilt; these patches are small, but they stitched together beautifully! The units are 3" x 3"; 3" x 6"; and 6" x 6". I never could have done this without the pre-cuts. Pre-cut patches from John Flynn I wanted to make one to show my students two different colorways. I tend to over-prepare for my classes. I want my students to be inspired by different colors and fabrics. Yes, I kept the little boats all going in the same direction. I guess there's no storm happening out there on the seas! Storm at Sea (pattern on Etsy) Cutting these diamonds and half-rectangle patches are made easier using a Tri Recs tool (or other rulers lik

Storm at Sea: Day 2

Image
Here is the first quilt I made testing out my pattern. I had to make sure I knew what I was doing since I planned on getting a few hundred kits laser cut for my workshops. NO room for error! Storm at Sea kits quilt I decided to add those little boats in the four corners. They measure 5" x 5", but since the patches were already cut, it just meant that the students had to be careful with their 1/4" seams (and they were). In my pattern, I include the option of making those by paper piecing. This is how John Flynn's company packaged the units so as to keep everything neat and tidy! I took one of my samples and finished it without a border. I donated it to a local charity a few weeks ago. Here it is as a quilt top I made in 2010. Storm at Sea quilt top (35" x 35" center without borders) Yes, I know those boats are somewhat "lost at sea" but I know some little child will find this a fun quilt to snuggle under. No borders; just striped binding. Storm at

Storm at Sea: Day 1

Image
I've been revisiting a quilt that I honestly thought I'd retired! I taught a series of workshops about 9 years ago and made a few quilts for those. But one I made just the other day is becoming one of my favorite ways to color the units. I call it the "I Love You" version (a heart). Can you see it? Storm at Sea Heart center (35" x 35") For my workshops I had decided to get the quilt kits laser cut by John Flynn . They were awesome and when I handed them out to my students and they looked at all the perfectly cut patches (and NO cutting for them), they stood and clapped and cheered! I was a Rock Star (for a day). Click on that link and you can go to his web site and see the various Storm at Sea kits ready to go! Here are the blocks before I put them together in my Heart version above: Units ready to put into my Heart Storm at Sea And here is the vintage pattern as given almost 100 years ago! Do you think you'd want to do it this way? I'll be back to

Double Wedding Ring Week: Day 5

Image
Time to wrap things up for this Double Wedding Ring Week. I want to show you some small projects that use the simplified shapes in a different way. I also have an updated vintage pattern, Pumpkin Seeds . This also goes by the name of Orange Peel. I used the small melon cutaway from my template set to make this. Pumpkin Seeds Quilt : 34" x 42" This is very Charm Square friendly. The red melon shapes were cut from a stack of red charms (5" squares). I used several black and white prints for the backgrounds. This is NOT pieced (as was traditionally) but those red melons are appliquéd to the background squares! Here is a pattern page from August 1, 1956. Yes, those are templates and you are expected to stitch those curves perfectly! Here is one of the first quilts I made using my technique. I made it in 2002 and it was published in 2004 in Quilt magazine. Orange Peel quilt, 2002 Another way to use that simple melon shape is in a small table topper. I made it twice: once, usi

Double Wedding Ring Week: Day 4

Image
Now for combining all those small patches of the arcs into a single fabric and simplifying the whole process. I first published this concept in Quilt Magazine about 20 years ago. These are single fabric melon shapes appliquéd to the background fabric. Stitched so the edges fray (like a rag quilt). Have no idea who I gifted this to! I created it again for my first book (Bold, Black and Beautiful Quilts, AQS 2004) and called it "Shotgun Wedding Ring." I'll let that set in for you - you can figure it out with this next quilt! This is NOT a digital image. You can see the quilting in the black fabric. My fellow editor, Susan Fisher, made this for the book based on a digital image I gave her. A bit controlled in the assembly, but the colors are "free spirited." Then, Windham Fabrics asked me to design a quilt using a reproduction set of fabrics. And I used this same shape and then turned it into a workshop for the Sewing Expo in 2012. Shotgun Wedding Ring It was the b

Double Wedding Ring Week: Day 3

Image
A lovely variation on DWR is a vintage block called Patty's Summer Parasol . Here is a page from a vintage pattern series. Published April 1, 1953! Look at those templates! You can see that it resembles a Double Wedding Ring in part. That got my creative juices flowing and I took a paper pieced arc and single melon and began to design. But I wasn't about to stitch it into the curved background! The top piece uses my DWR pieced arc with 11 fabrics. The bottom piece is a simpler unit, shorter and fewer wedges (8). (Someone once said that the top one looks like a flying saucer!) These are the foundation pieced wedges for Patty's Summer Parasol . Paper pieced wedges Drafted the melon and then interfaced the two sections (that's how I teach the class and my pattern reads). I decided on a 3-D prairie point tip and a fusible handle. Everything will be raw edge appliquéd to the cream background square! Patty's Summer Parasol block I wanted the parasols to dance across the

Double Wedding Ring Week: Day 2

Image
I was playing with some of the paper pieced arcs at the very beginning. I decided to interface them and appliqué them to a background square and add triangles to the corners. Pretty clever, huh? I use this as a teaching sample for Beginning Machine Quilting classes. This is a fuzzy picture (from 2008), but I think you get the idea.   4 paper pieced arcs, interfaced and aligned on square These are my paper pieced arcs before trimming and taking the paper off: Here are some trimmed arcs from one of the quilts yesterday: Paper pieced arcs Then I added corner squares and sewed along the diagonal; trimmed and pressed. I was playing with the Creative Grids DWR ruler set and used a single fabric arc. But this was a LOT of trouble, so I only made one! That's enough for today. Tomorrow is a sweet variation on DWR that you've seen here before, but she insisted that I include her this week. I know you'll like it!