Posts

Showing posts from January, 2018

Windham Wednesdays with Uncorked

Image
I often revisit my older patterns. We are in the season of Valentine's Day and all things hearts. I created this for one of my block a day calendars several years ago and made it up using some brights and dots and flowers from Windham Fabrics . Here is my first one, which I called Stacked Hearts. It is one of my Craftsy patterns. Stacked Hearts The block is 8.5" x 12" and the finished mini quilt is 21" x 21". I recently received a bundle of fat quarters called Uncorked . It is cotton fabric designed to look like colored cork fabric. It has metallic accents and the color range is awesome. See for yourself. I cut these for an upcoming pattern for Windham . There are 24 skus in the collection and I cut two squares from each one! Uncorked squares selected the lightest gray and the deep red for a remake of my Stacked Hearts block. I cut out my freezer paper template and ironed it to fusible backed red fabric: Preparing to cut out my Stacked Heart

Hearts: Love is in the Air!

Image
I have a lot of scraps (really?!!). I took some of my fabulous Kaffe Fassett scraps and my OLD simple heart pattern and cut out 45 hearts. I first fused paper backed webbing to the wrong side before cutting out. Now what to do? 45 hearts ready for a quilt Have you seen some of my REALLY old patterns using hearts? Let me show you! This first quilt was the result of trying to hand appliqué those hearts from Keepsake Quilting catalog. I could NOT do it. Then I machine appliqued them to a background hexagon and the rest is history. There are NO y-seams in this, btw. This was published in early 2002 in QUILT Magazine. Black and Bright Hearts Quilt: 37" x 38" This next quilt appeared in my first book, Bold, Black and Beautiful Quilts (AQS 2004). More hearts from that Keepsake pack of hearts. And I got so bold as to use ORANGE as my background fabric. What's with that?! Dancing Hearts: 32" x 42" (8" blocks) Now for a ring of hearts that my dear f

Layer Cake Pattern: Stained Glass Pickup Sticks

Image
I designed and sewed this quilt more than 10 years ago, right when those 10" stack of squares began hitting the quilt store shelves. It is part of my Magic Stack series and I thought I would feature some of these now and then on my blog. This first quilt (54" x 64") is a bit larger than the pattern size. The quilt in my Craftsy pattern is 52" x 62". Stained Glass Pickup Sticks I made this using 10-1/2" squares cut from batiks, but my pattern has been rewritten for 10" squares. This is so easy! I taught this as a workshop for a few years; let me show you a few of my other quilts. This 8 block table runner was our project for a half-day workshop. Students could expand their quilts with more squares. 8 Block Table Runner  Then, I took a stack of some Asian inspired prints from Blank Quilting, and created this 16 block quilt. Don't you just love those thin black strips - looks like stained glass, doesn't it? 16 Block quilt cent

Lakeland 2018 Sewing Expo Classes

Image
Year # 11 for teaching with the Original Sewing and Quilt Expo! I love being able to create new workshops annually; it really animates me to do new things with new fabric for old and new students. What's happening in  Lakeland, FL  March 15-17, 2018? Well, here are the classes I'm offering. Big Block Lone Star : Thursday, March 15, 8:30 - 11:30 am Big Block Lone Star . Block: 29" x 29". Quilt with borders: 40" x 40" Make a Lone Star Quilt in a day! No need to tediously cut out templates when you can simply rotary cut and strip piece for accuracy with NO y-seams. This is a wonderful BIG block (29”) and makes a great wall or child’s quilt (40” with borders).  Bring your own fabric, see supply list for details. And just to show you that this is one of my "go-to" patterns, a few other quilts made with this VERY easy technique. No y-seams, btw! Big Block Lone Star appeared in my Supersize 'Em Quilts book (2009) And, of course, the

Happy Friday Finish!

Image
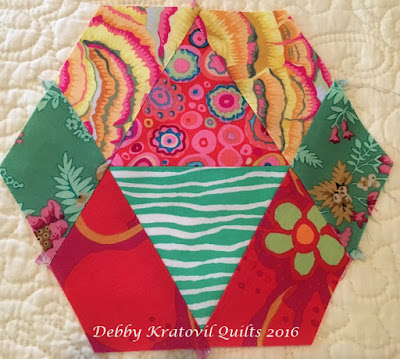
Do you remember this block? I made it last year using The New Hexagon Perpetual Calendar by Katja Marek (published by Martingale).  This is the January 13 block: January 13 block from the calendar using Kaffe Fassett fabrics Wow. That's a lot of funky angles. How did I sew it? For my years working on the editorial staff of Quilt Magazine, we were advised to always "look for the long seams." Allow me to show you. Step 1: Sew the center two triangles together Sew two triangles together  Step 2: Sew one half-hexagon to the bottom triangle Adding one half-hexagon to the bottom triangle  Step 3: Sew one half-hexagon to the other side of the bottom triangle Second half-hexagon sewn to bottom triangle  Step 4: Sew a diamond to a half-hexagon twice and then join to the top triangle. Adding the last half-hexagons and diamonds See?! No y-seams. All straight seam sewing. And each of those patches were cut using a rotary cutter and my 60 degree ruler! Th

Technique Tuesday: Fun with 10" Layer Cakes

Image
Are you looking for a creative way to use a stack of 10" squares? Often referred to Layer Cakes (yum, yum), we often wish there was some icing to go along with them, right? (I'm just kidding) Benartex sent me this beautiful  Essence of Pearl  Layer Cake in the Purple colorway. I asked for a companion fabric to go with these, one yard of the light lavender Tossed Sprigs. Essence of Pearl  10" Squares I was aiming for hexagons (surprise, huh?)  Hexagons are wider than they are high, so I cut 2-1/2" strips from each of the 10" squares. This gives me 7-1/2" x 10" rectangles to work with for my next steps. 2-1/2" strips cut off each square There were 42 squares in the pack, so I ended up with 42 strips 2-1/2" x 10". Trust me: I will use these later on. Nothing is EVER wasted in my quilting (even if I have no clue where I'm going!) You can see the Purple Tossed Sprigs fabric that I'm going to use to tie all this together.