Posts

Showing posts from April, 2019

Rose Star My Way

Image
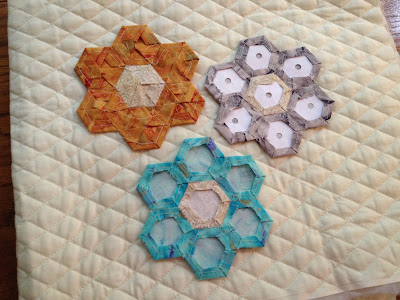
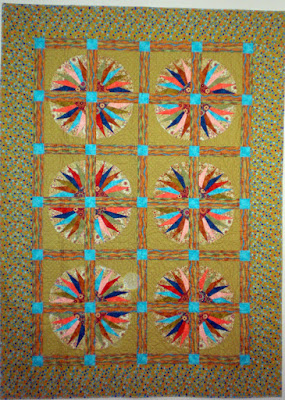
I have come to love this vintage block called Rose Star. Not sure why since it involves a LOT of y-seams using a kite shape. I typically avoid y-seams as much as possible (though I certainly can stitch them). First, let me show you my first Rose Star quilt. Rose Star Table Topper: 30" x 34" I did a lot of research on this block and also did NOT want to cut all those kite shapes using a freezer paper template. I went ahead and had my own Kite Template made (since I was planning on making this a workshop). My Kite Template I standardized this to a finished 5" height. I didn't want to use one of those multi-sized rulers because of several things: They're TOO expensive They don't have the size I wanted. Creative Grids has 4 sizes, but not my 5" height. And it costs $27.49! The one by Sarah Nephew/C & T Publishing/Marcie Baker is $26.00 and doesn't show how to cut kites! Yes, I said that right. It's shaped like a kite but there ar

Windham Wednesdays with Bedrock Gingham

Image
I made a little more progress on my Gingham Quilt using Bedrock  by Windham Fabrics. Remember? I was going to imitate gingham by sewing a lot of squares together! This is the concept (and a piece of Black/Gray/White gingham): Actual gingham fabric Now, my fabrics from the Bedrock Collection by Windham. The red is going to be my inner border! Bedrock Fabrics for my Gingham Quilt I did a little math and some calculations and began to cut my strips. These are 2-1/2" x wof. 2-1/2" strips of my 3 Bedrock fabrics Then I began assembly of my 3 blocks. I stripped two black and one gray strip as shown. Then I cut the strip-set into 2-1/2" wedges. Black-Gray-Black. First strip set for Block #1. I need TWO of these.  And the strip set of gray-white-gray. I will need ONE of these. Second strip set for Block #1. I need ONE of these for each block Now, put them together: Three wedges ready for Block #1 Block #1 is sewn. I need to make 9 of thes

Earth Day Quilt, Fabric and Fun Pattern

Image
Happy Earth Day. I love the earth! It's the only place I can live for the time being. I try to be respectful (because the Designer is watching!)  And, as a quilter, you know I have a thing or two related to the earth. The first is a piece of map fabric showing all the continents. This is from Windham Fabrics . Pretty awesome, huh?  Theory of Aviation fabric panel of the continents And the second Earth Day pic is from 15 years ago and is called Trash Basket Batiks because I rescued and recycled fabric that had been thrown into the trash can and made this quilt. I mean: isn't Earth Day about creative recycling? We quilters do that all the time! Trash Basket Batik Garden

Windham Wednesdays and Bedrock Gingham

Image
Gingham? Does Windham make gingham fabrics? Do you even know what I'm talking about? To be fair, let's first define it (for those who never wore it or sewed with it in previous decades): " Gingham " comes from the Malayan word genggang, or "striped." The way we identify  gingham , as being a contrasting-check shirt, was not the way in which the fabric was originally known. True  gingham  is distinguished primarily for being a "dyed in the yarn" fabric, meaning the yarn is dyed before it is woven. I prefer to let a picture communicate what I'm trying to say. Take a look at the various colors in the image below. I bet you've seen fabrics like this (or maybe you even wore a shirt or dress in these prints!) Gingham in lots of colors And here's one that I used for inspiration: Black, Gray and White gingham This is the first of two posts. I'm waiting for Windham to send me more of their Bedrock fabrics so I can make a

English Paper Piecing with Small Hexagons

Image
 Last week I taught an enthusiastic group of quilters how to English Paper Piece. To be fair, many of them already knew what they were doing, but wanted to see if they could learn something new. And they did! I showed them a better way to baste the fabric OVER the card stock and not THROUGH it. This way I can remove the papers and not remove the stitching, which saves a LOT of time. The first image (orange) is a finished block before I trim the fabric. What? I don't cut fabric hexagons? Of course NOT! I cut fabric rectangles that are at least 3/8" larger than the size of the hexagon. I punch a hole in the center of the paper hexagon (second photo) which does two things: 1. Gives me a place to put my pin to secure the fabric/paper together 2. Gives me a spot to stick a retracted pen through to "pop" out the paper. Wrong side of my 3/4" Grandmother's Flower Garden blocks Once I have trimmed the fabric (as in the gray block above), things are neat

Windham Wednesday with Uncorked

Image
I keep coming back to my Metropolitan Star pattern. You've seen it here before several times. I am teaching it as a workshop at the end of April and I needed some samples. This is the vintage quilt that inspired me: Pulled from a Metropolitan Home Magazine in the 1980s And the one that appeared in my 2nd book, on the cover! Blocks are 21"! Metropolitan Home Star: 69" x 69" I have an older fabric from the Kaffe Fassett Lille Collection and I pulled some blenders from the Uncorked Collection by Windham. 4 fat quarters from Uncorked by Windham Fabrics Vintage fabric: it's time to cut it up! Uncorked fabrics to go with this Lille fabric And I made several blocks this afternoon. They are paper pieced. Four star points for my 21" blocks  Not sure if I'll mix them up in each block or stay with four of the same color. 4 star points. 7" square each My students can make a variety of assemblies. Here is one I shared las

Summer Workshops with Quilt Odyssey

Image
Yes, I teach at TWO quilt venues in July. The beautiful part is that I can drive and stay in a hotel and not drag suitcases through an airport. The Quilt Odyssey has their show in Hershey, PA (yes, THAT Hershey, where there is the smell of chocolate everywhere). The venue is beautiful and full of great chocolate distractions, but I try to keep my mind on quilting. Here are the three workshops that I will be teaching, beginning with Spinning Waterwheels . I know you remember this quilt - I've blogged about it more than once. Let's see the original. I have since gifted this to one of my grandson's teachers. I know she loves it! Original Spinning Waterwheels This quilt appeared in my book, Paper Piecing Perfect Points (Martingale 2013). I sewed this many blocks because I sewed until I ran out of fabric! (That is my traditional method, btw). I decided to remake it in black, red and white and I sewed until I ran out of THOSE fabrics. First the center - where I thoug