Posts

Showing posts from January, 2024

Velvet Stars FREE Pattern

Image
I made this quilt in 2001 and published it first in Quilt Magazine. I had seen a tattered velveteen-backed pillow at a yard sale and the colors in the needlepoint were bright and cheery. The pattern inspired me to make this in rotary cut strips. My method was to use templates (so old school!) Velvet Stars : 46" x 62" These are 12" blocks. I had a packet of 1/4 yard cuts of beautiful solid fabrics. I cut and stitched at random. Each star is composed of 8 colors without thought of "matching." I also published it in my first book, Bold, Black and Beautiful Quilts (AQS, 2004). I found an error in the pattern (not my fault - the editor always has the final say). Here is a digital image of the blocks without any sashing. Velvet Stars : 12" blocks I tossed the templates and streamlined the piecing. Each QUARTER STAR is composed of: One 3-1/2" x 6-1/2" strip of Color A Two 3-1/2" squares of Color B One 3-7/8" square each of Color A and Color B

More Block Setting Solutions

Image
Sometimes you just run short of fabric and you KNOW you have to get a quilt from what you have. Here is one I designed to actually work with 5 blocks. Mi Casa es Su Casa Fabrics are from Dwellings Collection by Benartex. The centers of these houses ("casa") are printed panels that resemble improvisational log cabin blocks. I added roof tops (Flying Geese units) and then the green and white fabrics in the center take the place of a single block cut in half. I did the same thing with some brown log cabins for a companion pattern to go with my friend's Creative Grids ruler (Jean Ann Wright was my senior editor at Quilt Magazine). Warm Welcome Home I took the same approach with the next quilt. Again, some log cabin blocks looking for a home. Orphans given to me. Quilted by a friend and donated to a local charity. Log Cabin Stars Here's one using some English Paper Piecing blocks. Yes, there are 6 blocks but I set them with the extra rectangles so they are staggered in the

Creative Settings for 7 Blocks

Image
I thought of another quilt that uses a 3 x 3 block setting, but I only had 7 blocks. I paper pieced these Shark's Teeth blocks and squeezed the life out of the fabrics, but couldn't get any more than 7. I shared this with you last June. It happens all the time (to me). I do not typically "count the cost" before I jump in and start sewing with a quilt in mind. Then I run out of fabric to finish the number of blocks I need, say, for a 3 x 3 block quilt. That's what happened here in my Mistletoe  Shark's Teeth  quilt. Mistletoe Shark's Teeth quilt: 10" blocks. 38" x 38" quilt I cut two panels the same size as the blocks (foundation pieced) and put them at the top. Fun, huh? Here's another creative solution I came upon for more than 7 blocks, but not enough for a square quilt. First, the original quilt. I named it Spiroglyphics (have NO idea why!) I made this 20+ years ago and I've since given it away. All batiks. Spiroglyphics Quilt The

Jewels: Cast Your Vote

Image
I found a bag of leftover fabrics from a collection I ABSOLUTELY love. They are the Regency Dandy fabrics from Windham - 2007! I made this awesome Princess Feather quilt not once, but twice. Windham owns the first one and it hangs proudly in their New Jersey office. Princess Feather: 56" x 56"  I made a Palm quilt, too. This was given to a neighbor after some surgery. Regency Dandy Palm quilt One more before I ask you to CAST YOUR VOTE: Zig Zag Pyramids Now for my dilemma: I cut some diamonds from the remaining fabrics. They sat for a few years. 4-1/2" diamonds (60 degree) I became enamored with jewels (what woman isn't?) and had another plan. I cut little triangles off the tips (there IS a formula). Diamonds to jewels Then I made this sweet quilt and added a border from another Windham collection (Raj). I bound it last week and it's being donated to a local charity. This is QUILT #1 . It uses 54 jewels. Diamonds to Jewels : 43" x 44" QUILT #2 takes th

7 Blocks; Square Quilt!

Image
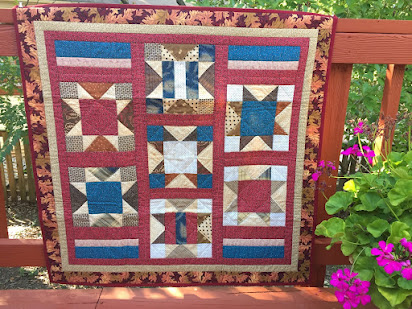
I pulled a quilt from my closet that I stitched in 1996. It was made from several deconstructed swastika blocks a dear friend gave me. She knew I liked a challenge and we agreed that no one needs to be reminded of swastikas! Let's make something happy. I did just that. It was determined by quilt experts that the fabrics date to around 1890! I added some reproduction fabrics and actually hand quilted this. I think I'll hang it so I can truly enjoy it. It didn't like being cramped in my closet, anyway. 1890s Stars: 36" x 36". 8" blocks What I noticed on Sunday was that there are only 7 blocks, but the quilt is square! That means that I used spacer strips that equal four half-blocks in the top and bottom sides. Oh, I was so clever and I didn't realize it! Here's a recent quilt finish that I haven't shared before that, again, was able to create a square (3 blocks x 3 blocks) center using only 7 blocks. I had 7 panels that I surrounded with coordinatin

Happy New Year!

Image
I taught a postcard workshop in 2005 and I used some "bling" to spice up my creations. Here are two that I made for New Year. I think I got the idea from an Asian inspired book that used a hexagon as a motif. I created the fabric part (including the sewing machine words) before I stitched it onto the card stock back. Notice how I machine stitched the fabric to the card stock. Then, I used a rotary cutter with a pinked blade to trim the edges. I think I glued that tassel on last. Here's another one with a different print. Yes, you can send these through the USPS, but they have to be hand stamped at the post office. And they use first class stamps (and not postcard stamps). But, think of all the people who will see these and they bring a smile to their faces! I may have to do it again. I also designed a quilt using a block I named "Happy New Year." It appeared in my 2008 Quilter's Block a Day calendar (by Martingale). Happy New Year Block All this to say: Happ