Posts

Showing posts from November, 2021

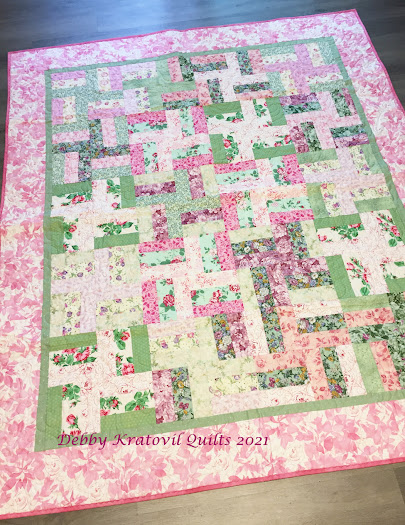
Blue and Gray Sampler: Block Six

Image
Sometimes life gets in the way of the very best plans (and that's ok - who really has control of their lives, anyway?) Nothing bad, just an interruption. Here is the last block in my Blue and Gray Sampler. I didn't have the energy to remake it, but I do offer the templates for you to give it a try. Order No. 11 Block . 12" finished  I used raw edge appliqué and the full quilt has four of these, one in each corner. Blue and Gray Sampler. 72" x 72" I would love to see your blocks. Please feel free to send me photos (kratovil@his.com) and I'll share them in the coming weeks. Many thanks for joining me in this very traditional quilt adventure. My friend Connie G. (who quilted this beautifully) is enjoying this quilt in her home. And I know the quilt is very, very happy!

Stick it To Me with Pincushions

Image
This is a repost from 2013 and was part of a blog hop. I thought it would be fun to entertain you again with my easy and quick pincushions made from scraps of batting and ribbon. First, two little pincushions that were gifts from friends. I use them all the time: This chicken does not mind being poked by my pins. He is just pretend. A fellow teacher, Kim, made this with a lot of bling. Filled with walnut shells. Now for my reveal. Let's start at the beginning: Start with cotton batting (this is Warm and Natural), approximate size: 2-1/2" x 52" Cut a strip of cotton batting; pink one edge (Your dimensions may change as you want a different height to your pin cushion.) Use a specialty cutting blade to pink one edge. Or, if you have a vintage pair of pinking shears, use them! You can use pinking shears or a specialty cutter (which is quicker)  Start rolling from one end Keep the straight edge even; roll tightly. Glue end closed.  I wrapped this with a black and white batik s

Holiday Magazine from Quilting Arts

Image
So many ideas, so little time! But, if you buy this issue, you will never run out of gift or decorating ideas for years to come. The Quilting Arts 2021 Holiday Magazine hits newsstands November 23 and it is filled with SO many beautiful things! Holiday issue  I received my copy 2 weeks ago and have looked through it every, single day since! While there are, of course, Christmas and a few Hanukkah items in there, small gift ideas for any time of the year are there, too! I especially like the Passport holder (which hangs around your neck with a see-through case). My Hanukkah Dreidel gift bags are there as a re-run from 2015. I still have some of the paper pieced units and I plan on turning them into coasters. And I have one of the bags, too! Dreidel Gift Bags (in my Etsy shop) Remember, Hanukkah comes "early" this year: November 28/29! My local library has a display case that I plan on putting my Hanukkah and Christmas mini quilts in for the month of December, and you can bet

Dogtooth or Shark's Teeth?

Image
I have made many of these units - mainly using paper piecing. If you want really, really sharp points then the best method (other than hand piecing) is foundation paper piecing. I've spent several years off and on making these strips with a variety of bright scraps and a fun dotted light background print. Dogtooth or Shark's Teeth units Doesn't matter what the name it, but you can be sure that either a dog or a shark have quite a sharp bite if their teeth are shaped like this! For some reason I made this with a finished height/width of 2-1/2". Here's what they look like as I was putting the pieced strips into long rows. Each vertical row finishes to 2-1/2" x 21". I eventually made 13 rows. 6 of my eventual 13 Dogtooth Rows Then I upsized the units and made them with Christmas prints last year. I gave these "Shark's Teeth" as the name. But I made them fit into a specific space with 3 "teeth" in each square. And notice that they are

Blue and Gray Sampler Block 6

Image
 Block 6 is Order No. 11. I will share this next week! Until then, go work on your previous 5 blocks. Blue and Gray Sampler: 72" x 72" What's Order No. 11? The four corner blocks. Go do some research on what that block name refers to. 12" Order No. 11 Block

Mom, Can You Make a Quilt for This Space?

Image
My oldest daughter Audrey and husband bought their first house in Baltimore. It's a row house with a lot of character (and two sets of 18 stairs!). At the top of the first flight is a space that begs for a skinny quilt - at least that's what Audrey thought. And, you know she thought of me. She loves all my Gee's Bend quilts and took 2 of them to live with her about 10 years ago. She liked the center of the Lazy Gal quilt and asked if I could make that fit to a 16" x 42". Are you kidding? I can do just about anything quilt-y! Do you remember Lazy Gal ? It's one of my favorites. Here is the original one by Quinnie Pettway. Lazy Gal by Loretta Pettway, Gee's Bend, Alabama Here is how I patterned it for Windham Fabrics in 2009. Pretty close, huh? Lazy Gal interpreted by me. 52" x 62" And here is the quilt I made for Audrey using just the center of the Lazy Gal quilt. It's only 15-1/2" wide. I had to use the colors I had on hand, though a fe

Recent Charity Quilt Finishes

Image
You would think that with all the quilts I finish and donate each year (between 2 and 3 dozen) I would make a dent in my fabric stash. Ha ha ha ha ha! You know this stuff multiplies in the night when we're all fast asleep. It's just a trick! Funnies aside, here are 3 recent quilt finishes from a few weeks ago. (I have 4 quilts awaiting the binding, sitting in a bag in my dining room.) This first quilt was made by my sister who was living in California and just wanted to de-stash for her move to Idaho this summer. It is a lovely scrappy Rail Fence. Pink and Green Rail Fence: 56" x 66" The next one uses some leftover fabric panels from a fishing themed collection called "Keep it Reel" by Benartex. I stitched the Cobblestone blocks and a guild friend put them together and added the border from what I put in the bag. Here's the front: Keep it Reel: 42" x 42" And Diane pieced the back. A wonderful way to use it all up! Keep it Reel quilt back The th

Hourglass Block Tutorial

Image
Below is a post I did for Benartex this time 7 years ago. The fabrics are so cute and I pulled out a tried and true technique for making Hourglass Blocks. I share the pics of this FINISHED at the end. Hope you enjoy the tutorial! This will work with just about any fabrics. It's natural for sheep to want to knit or crochet, right? Knitty Sheep, Knitty Sheep: can you knit with wool? No, ma'am. No, ma'am. I never learned in school! What! That sounds so crazy. Did you skip classes just to play? No, ma'am, I took a class to learn how to crochet! Whew! Now that's what I'm talking about! I can't knit and can only crochet. It's refreshing to find wool bearing sheep who know what to do with their hair! Knitty Sheep flannels I wanted so badly to capture the sheep in a horizontal strippy type quilt. I measured and figured that I would be able to cut 4" strips without lopping off any important sheep body parts! I allowed 1/4" from the tips of their little