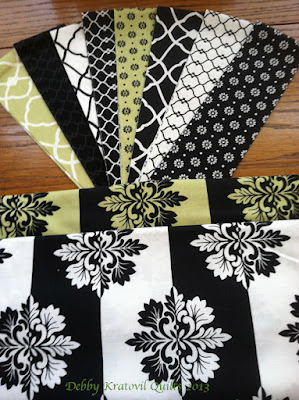
Do NOT roll your eyes! It's not becoming. It's true: you either LOVE or HATE paper piecing. Yes, my new book is finally in and it's all about paper piecing. Large blocks. Pretty blocks. Blocks with very, very sharpy-sharp points. How else do you think you can get them SHARP except by paper piecing? (More about my book in a few days; I certainly will have a giveaway!) Check out the interview on Martingale's blog - they share a lot of info about my book:
Paper Piecing Perfect Points.
Today I have an extensive tutorial using one of the blocks in my book (
Paper Piecing Perfect Points) called Spinning Waterwheels. I am remaking the blocks in a new collection by
Blank Quilting called Tanglewood.
If you stick with me, you can have a chance to win a bundle of 11 fat quarters! Contest is over.
 |
Aren't these just lovely?! |
 |
The Tanglewood Collection by Blank Quilting - 11 fat quarters can be yours! |
First, we cut out the pattern very close to (but not exactly on) the outer seam line. You cannot leave the pattern in the 8-1/2" x 11" size. It will cause you to place your patches incorrectly and then you may have to unsew!
 |
Cut pattern out. |
 |
Fold along EVERY printed line. |
This is better than trying to hold the pattern and the fabric up to a light source. The printed side is the sewing side; the unprinted side is the side the fabric gets placed on. How else will you get an idea of the position for the fabric? Of all the tips I give in my classes, this one is in the top 3!
I combined the Tanglewood fabrics with some 2-1/2" strips from the Red Hot Collection by Blank.
 |
Pre-cut fabrics (rectangles); sizes are given in pattern. Now you can go for "mindless" sewing. |
By folding back along the lines, you can expose the excess fabric of Patches #1 & 2. Using a ruler (I like the Add-a-Quarter), trim leaving 1/4" seam allowance.
 |
Trimming the first two patches; leave 1/4" seam for Patch #3 easy alignment |
The first two fabric patches are the hardest to get. Just remember: you are sewing as your normally do with the wrong sides of fabric toward you. It's that you have a piece of paper between you and the fabrics you are trying to sew. My book has details on how to line up the first two patches. The fabrics are cut over-sized so that you have plenty of wiggle room. Once you sew on the line between Patch #1 and Patch #2, you press them as shown and then trim using the Add-a-Quarter ruler. When you leave a 1/4" seam allowance (as shown here), it is SO easy to then add the next patch without guessing.
 |
First 2 patches sewn. |
Add Patch #3, using the cut edge as shown above for your alignment. You don't need to hold it up to a light source. You can be confident that placing the red patch (as shown) will be large enough to cover the space.
 |
Adding Patch #3 along the cut edge of Patches 1-2 |
 |
Press Patch #3 after sewing; trim to 1/4" seam |
Continue sewing, trimming, pressing until you reach the end. What do you get?
 |
The wrong side of the block. Circles & arrows show how the seams have to criss-cross. |
And then the trimming gets you what?
 |
A finished & trimmed block; can you see those awesome 1/4" seams above the points? |
OK. Show me what it looks like without the paper. Wow! No messy ##*@## like in traditional paper piecing, with wads and globs of fabric. This has been trimmed along the way so that when the paper is removed, it looks as though I used templates. Our secret is that I didn't!
 |
After the paper is removed - Wow! that looks very neat, huh? |
Time to add the background piece. Oh, no! Don't get the cold sweats. These are biggish blocks and the curves are gentle. I'm going to share my special secret on how to make these really fit.
 |
These WILL fit together; but they won't if you leave the paper on. TAKE OFF THE PAPER BEFORE DOING THIS! |
I have always. Always. Always removed the paper from my foundations before joining them to their neighbors. And in the case of joining a convex to a concave unit (a little math/trash talk here), you must, must, must remove papers. Or else they won't have any give. We are working with bias edges and easing things in. Do you think you could have put in a sleeve in a dress if it had some sort of non-stretching hindrance to it? Of course not!
 |
My secret: double pin as shown here. |
You do not want those straight edges of the background piece to "wander" when being sewn. I keep the pins in until I'm finished with the seam. How does it all look?
 |
Unit A and Unit B, ready to get the bottom triangles sewn on. |
To see all the pictures in my book and to hear several more tips (and get the back story about how I learned to love paper piecing), go read the
Martingale blog's interview about me.
You have until midnight Monday Feb. 25 to win a copy of the book.
As always, I am so pleased that you came for a visit today. I don't take you for granted. And if you haven't had an email from me in a long time, that means you are a no-reply blogging commenter and you need to make sure I have your email in order to be entered in the contest.