I just returned from 3 days of teaching at the Quilt Odyssey in Hershey, PA. It was their 20th anniversary and my 3rd year of teaching with them. I thoroughly enjoyed my time (I love teaching) and especially enjoyed my students. I learn so much from them - it's not a one way street!
Here is one of my two teaching samples. I made this in early 2009 from a Blank Fabrics collection called Holiday Splendor. The center Lone Star is a whopping 35" square! The quilt is 50" x 50"
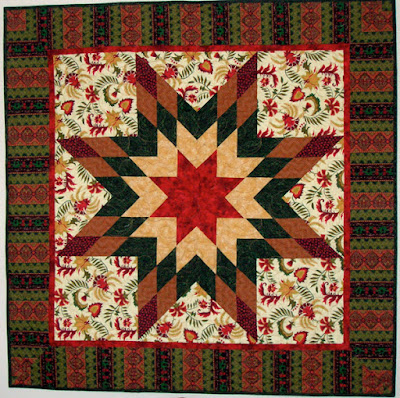 |
| Holiday Splendor Lone Star |
I set in those floral print squares and triangles (and I teach that as one of two methods). I didn't want to break up the print with a seam. But 95% of the time, when I make quilts like this, I split those outside background pieces.
Then I took another collection of blues and made a second Lone Star. This is all rotary cut strips sewn into sets of 3 and then cut into 45 degree 3-patch wedges. NO templates! As you can see (if you look closely) that I split up those blue background pieces for ease of construction. No y-seams here.
 |
| Blue and green Lone Star |
But, then I got the crazy idea of using bias strips in all the background sections. . . AFTER I put the borders on! Quite a bit of ripping and tearing (and some grunts and groans). I had to open up the seams to insert the 16 bias strips and then stitch things back up, but it worked. (Not a great picture for the colors; the photo above is the true color.)
 |
| Lone Star with bias detail |
I got this idea from a vintage quilt I saw. Nothing new under the sun, is there?
Then one of my students shared a photo with me of her quilt in process. This class is called ONE Day Lone Star. That's because most students can get their Lone Star center put together in one 6 hour workshop. Here is what Lisa G. shared with me yesterday.
 |
| Lisa G.'s Lone Star with bias strips (in process) |
And then this morning she sent me this pic. She wanted to add an extra appliqué touch in those corner squares. Off the chart gorgeous, don't you think?
 |
| Corner detail of Lisa G.'s Lone Star |
In a class of 18 students, there are always those who "stray" from the pattern and create innovative elements. This was one of them. And then there was Susan H., who has a background in costume design. She is afraid of NO fabric, NO sewing technique. She just knows where she is going and enjoys the ride.
She wanted to put a miniature Lone Star in those corner 11" squares. Not a problem. She figured it out. Used 1" cut strips and this is her creative solution to otherwise plain background squares.
Please note: This Lone Star is a miniature! She is making four of these, one for each corner!
 |
| Susan H.'s miniature Lone Star |
I brought several other Lone Star quilts to share with my students. Some had the diamonds composed of only a single piece of fabric. Several used two pieces. I've shared these in past blog posts.
 |
| Lone Star made with 8 single fabric diamonds |
 |
| Two large table mats using 8 single fabric diamonds |
The next two quilts were the basis of my workshop, Big Block Lone Star. The centers are a whopping 29" square!
 |
| Big Block Lone Star (29" center) |
And this one was in my second book, Supersize 'Em Quilts. Center block is 29" x 29".
 |
| EZ to be Green |
This also was in my Supersize 'Em Quilts book (Martingale, 2009).
 |
| Farmhouse West Stars. 19" blocks |
And another single fabric diamond star.
 |
| Single star |
And one last one. This appeared in the Keepsake Catalog (I designed and sewed it using Windham Fabrics.) Storybook Lone Star.
 |
| Storybook America Lone Star |
The Lone Star remains one of the most beloved of all quilt patterns. Being able to avoid those set in seams for the corners and side triangles makes it doable. And using strip piecing instead of templates makes it VERY quick! Hope you enjoyed the show.


Comments
Post a Comment
Thanks for stopping by Debby Kratovil Quilts! If you had a question and don't get an answer from me, please feel free to email me at: kratovil@his.com