Posts

Showing posts from March, 2022

Playing with the Flowers
Image
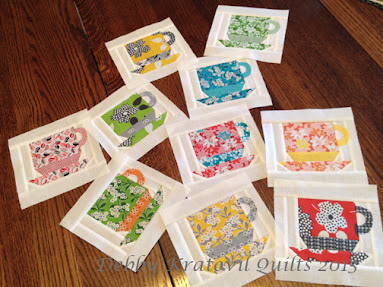
Spring is here in Virginia, though it's still quite chilly outside with a dash of rainy gloom. But the flowers love it! It seems that a lot of fabrics focus on flower designs and this older collection from Windham, Mimosa, doesn't disappoint! I made some paper pieced coffee cups several years ago, thinking I would put them into (yet another!) quilt. I DON'T need another quilt, believe me! Paper Pieced Coffee Cups : 7" (2015) Here are two that I quilted yesterday and are going to live with my in-laws in New York. They insisted on being photographed next to my floral table runner. They wanted to play with the flowers! Two Coffee Cups heading to New York I think I will make the others into these easy mug rugs. I like to keep little gifts like these on hand for those unexpected times I want to arrive at someone's home with a "thank you." I made this set of 4 green cups for my niece. I think I like the straight line quilting better. Four matching Coffee Cups

Windham Wednesdays with Diamonds

Image
I blogged about the  Addison Collection  10 years ago and revisited the techniques a few days ago when I presented a quilt lecture to a local guild last week. I presented my Modern My Way: Vintage Roots, Today's Colors and showed some vintage quilts and techniques and then my quick take on simplified versions. First, the fabrics (which are long gone from my stash!) Aren't these beautiful? I asked a quilting friend and fellow teacher to cut some 60 degree diamonds using her AccuQuilt cutter from these fabrics.She took home my box of these fabrics and used the 60 degree template/die and cut a huge stack of beautiful diamonds. They measure 3-1/2" from flat side to flat side (both ways). Accurate, beautiful 60 degree diamonds cut with the Go Cutter And she also gave me the leftovers. (You'll see what I did with the leftovers toward the end of this post.) Two diamonds cut per rectangle with extra fabrics for half-diamonds Now, what am I going to do with them? Am I really u

The Sewing of the Green

Image
Happy St. Patrick's Day. In just about every fabric collection I have found there's at least one green. I think it has to be that way since green is everywhere around us - a natural color. Even the daffodils that are blooming outside my windows have a generous amount of green to accompany the yellow! Here is my St. Patrick's Day quilt with a lot of green. It's from my Block a Day Calendar (actually, two blocks). This uses the Windham Uncorked fabrics (still available at your local quilt shops). Irish Cross and Chain Then there's my very green Winding Ways quilt . Yes, a LOT of green! This also uses some Windham Fabrics, this time with the Sweet Wish set of batiks. I've done an extensive blog post about this and my "cheater's" method for making this otherwise difficult block. Do a search for "Winding Ways" or even click that Etsy link to see a lot of process photos. Winding Ways quilt : 10" blocks. 48" x 48" About 10 years

My Gingham Quilt is Finished!

Image
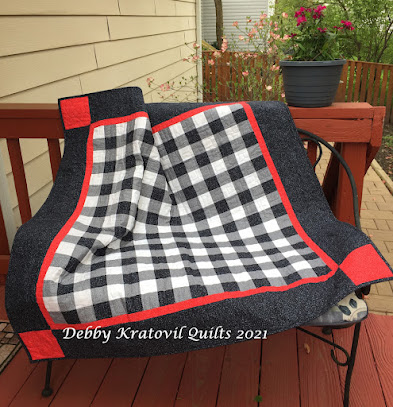
I shared two blog posts in 2019 about my tortured method for piecing this quilt using Windham's Bedrock fabrics. After I stitched all the units, I realized there was a MUCH simpler method. Oh, well. Here she is finished! 6" blocks. Buffalo Plaid (aka Gingham) Quilt: 50" x 50" Here's a closeup of my Bedrock fat quarters after I made this quilt. Such lovely colors! Bedrock Fat Quarters I actually patterned this for my bloggers, so you can find it in that link above. Here are some of the 6" blocks. Sometimes you just need to make something to discover an easier way. I gave the quilt away to a John in Pittsburgh who loved my black and white and red mini log cabin quilt. But it was SO tiny on the back of his couch, I decided to finish my Buffalo Plaid quilt and send it to him. Diamonds in the Logs mini, first quilt for John Let's see the Gingham Quilt flat so you can appreciate those awesome blocks. Honest, the whole thing is composed of those 6" blocks

Check This Out!

Image
Check This Out! Squares In Your Borders (This first appeared in Quilt Magazine, Spring 2004!)   There are times I want more than just a pretty piece of fabric as the outside border to my quilt. But the thought of doing more piecing after finishing the quilt center is more than I can bear. But pieced borders don’t have to be time consuming. A few patches here and there can be the perfect compliment to all the colors you’ve used in your quilt. Here are a few creative ideas to add checks and squares along the edges of your quilt.   First, consider a few strategically placed Nine Patch blocks. This is a fantastic option for those times when you miscalculated your border fabric and find that you are short a few inches. I actually had to do this with one of my Coffee Filter Fans quilts. Here she is before quilting. I didn't have enough of the green batik border without having to piece it! Coffee Filter Fans with 9 Patch borders Just introduce a Nine Patch unit here and there as shown in

Recent Charity Quilt Finishes

Image
I make a LOT of quilts. I love to play with fabric and each new bunch seems to be more glorious than the last one! When I retire a workshop, I take the samples and finish them into quilts for my local quilt guild's charity opportunities. I live in Northern Virginia and my guild, Reston Quilter's Unlimited, donates several hundred quilts and quilted items to local endeavors (Young Lives summer camp, hospitals, nursing homes, etc). We are really prolific! Here are a few recent ones. I made the tops, my friend Jeanne C. quilted them and I put the bindings on. Cobblestone Blocks using Free Motion Fantasy. 54" x 54" I have literally used up the last inch of these fabulous fabrics by Amanda Murphy. I had to get clever with the border fabrics as I didn't have enough of one print to go all the way around. The centers are 9" squares with 3" strips all around! The next quilt is small, so it will go to our commitment for Young Lives (we promise 167 quilts!) These a

Scrap Bag Star FREE Pattern

Image
It's hard to believe that it's been 20+ years since I made this quilt. I'm sure she's enjoying living wherever she lives now (I have no idea who I gave this to!) It was published in Quilt Magazine Fall 2002 (we worked as much as a year ahead, so this was made in 2001). I called it "Autumn Scrap Bag Star". Yes, I know - we are entering Spring here in the Northern Hemisphere. But, get a head start on your Autumn sewing! Or make it in Summer colors - your choice. Autumn Scrap Bag Star : 81" x 81" Let me show you some of the steps and then you can get the FREE pattern. First, the large 24" block. It's a traditional star composed of squares and triangles and NO y-seams. This info is in the pattern. Let's see the steps to making those triangle units using small and big squares which are then cut in half. And the final assembly (all this is contained in the 6 page pattern) - how to cut those 3-strip sashings and the corner stones. Note: those s

Daffodils, Jewels and Hearts

Image
This is a repost from May 2016 when I shared on the Benartex blog about how I used some of their new batik fabrics. I hope you'll enjoy this and take a new look at your own batik stash! Today I have a lesson in ruler use that you'll enjoy!  I always like to say that I let the fabrics tell me what they would like to become. Whether they whisper to me or send text messages to my cell phone - I trust what they say!  Batiks from the  Dolce  and  Rio  Collections by Benartex Here are the five colors I chose for my project. I'm going to make flowers - perfect for Spring, right? Five fabrics for my flowers I am still enamored with hexagon shaped blocks and patches. The most recent is the jewel (some call it a gem). I discovered how to cut it using a standard acrylic ruler with 60 degree lines and a 60 degree multi sized triangle ruler. For a finished 6" high jewel, I cut 4-1/2" wide strips. Then I cut the selvedge off on the left side at a 60 degree angle as shown below.