
Check This Out!
Check This Out!
Squares In Your Borders
(This first appeared in Quilt Magazine, Spring 2004!)
There are times I want more than just a pretty piece of fabric as the outside border to my quilt. But the thought of doing more piecing after finishing the quilt center is more than I can bear. But pieced borders don’t have to be time consuming. A few patches here and there can be the perfect compliment to all the colors you’ve used in your quilt. Here are a few creative ideas to add checks and squares along the edges of your quilt.
First, consider a few strategically placed Nine Patch blocks. This is a fantastic option for those times when you miscalculated your border fabric and find that you are short a few inches. I actually had to do this with one of my Coffee Filter Fans quilts. Here she is before quilting. I didn't have enough of the green batik border without having to piece it!
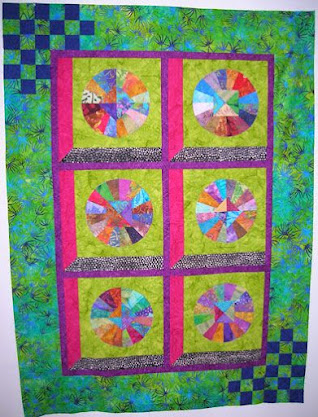 |
| Coffee Filter Fans with 9 Patch borders |
Just introduce a Nine Patch unit here and there as shown in Diagram 1. There are twelve Nine Patch blocks in this quilt setting, three in each corner. There are eight of Unit 1 and four of Unit 2 (notice the change in the placement of the colored squares).
There isn’t a lot of math involved. For a 6” finished border, your Nine Patch blocks will also finish to 6”. Each square finishes to 2”. Diagram 2 shows strips cut 2-1/2”, seamed together and then recut into 2-1/2” three-patch wedges. Seam these strip sets together to make the required number of Nine Patch units. Now, measure the width of your quilt top, subtract 12-1/2” (for the two Nine Patches in the top and bottom borders) and then cut a piece of the border fabric (which matches one of the two colors of your Nine Patches), adding in the necessary 1/2” seam allowance. Sew a Unit 1 Nine Patch block to both ends of both border lengths. Join to top and bottom of quilt center. Press seams.

Here is my Coffee Filter Fans quilt as she appeared in Quilt Magazine.

Measure the height of your quilt top (excluding the top and bottom Nine Patch borders). Subtract 12-1/2” (for the two Nine Patch blocks), and cut two 6-1/2” wide pieces of border fabric to that length. Sew a Nine Patch block to both ends of both pieces. Now add the four corner Nine Patch blocks and join the side borders to the quilt top.
The second option is shown in Diagram 3 (below)
I’ve added three-strip Rails between the Nine Patch units. This is also an almost no-math solution. The length of your rails doesn’t have to be any particular measurement. You make it fit the distance you need to fill. Determine how many Nine Patch blocks you would like to go around your border, placing them either symmetrically (evenly) or asymmetrically (uneven spacing). Then cut and stitch together strips as you did in Diagram 2. Recut these to fit the sections between the Nine Patch blocks.

The third option is to make a single checked border with longer strips (or logs) attached. Your quilt center needs to have a measurement that is easily divided into manageable square units. You may have to add extra strips along all four sides (as an extra inner border) so that the dimensions don’t require a slide-rule or calculator. For example, if your quilt top measures 57-1/2” wide, by adding 2” cut strips to each side, it will now be 60-1/2” (keep in mind the 1/4” seam allowance). 60” finished is an easy number to divide into squares: 1”, 2”, 3” finished units. If you use a 1” finished square, quadruple the length of the log to 4” and cut these 1-1/2” x 4-1/2”. Diagram 4 shows a plain corner square (the easy way) or a pieced corner unit. Diagram 5 shows the piecing of this unit, beginning with a Four Patch unit (based on the size square you use for the small checked border) and then Diagrams 6-9 illustrate the addition of strips and squares to equal the size of the corner.
There are so many other ways to introduce squares and checks into a border. The math doesn’t have to be difficult and your results will prompt you to invite your friends to “check out” your quilt!
Interesting. I will have to keep this in mind.
ReplyDeleteI have been looking for ideas on borders to finish a couple of panels that I have and I think that both of these would work. Thank you so much for the help.
ReplyDelete