Below is a post I did for Benartex this time 7 years ago. The fabrics are so cute and I pulled out a tried and true technique for making Hourglass Blocks.
I share the pics of this FINISHED at the end. Hope you enjoy the tutorial! This will work with just about any fabrics.
 |
| It's natural for sheep to want to knit or crochet, right? |
Knitty Sheep, Knitty Sheep: can you knit with wool?
No, ma'am. No, ma'am. I never learned in school!
What! That sounds so crazy. Did you skip classes just to play?
No, ma'am, I took a class to learn how to crochet!
Whew! Now that's what I'm talking about! I can't knit and can only crochet. It's refreshing to find wool bearing sheep who know what to do with their hair!
 |
| Knitty Sheep flannels |
I wanted so badly to capture the sheep in a horizontal strippy type quilt. I measured and figured that I would be able to cut 4" strips without lopping off any important sheep body parts! I allowed 1/4" from the tips of their little sheep heads. I was given 38" (basically a yard) to work with and the strip looks like this:
 |
| 4" strip, allowing for 1/4" from the tops of their heads |
(Important note: the line of sheep runs parallel to the selvedge. For a longer strip you need more yardage.)
Then I dug through my files and found a tried and true pattern for an Hourglass block using my quick piecing and cutting using a 45˚ ruler (NOT a kaleidoscope ruler).
I used
Judy Martin's 45 Shapemaker:
 |
| Omnigrid side setting triangle |
I'm able to get two full blocks from two contrasting fabrics cut 2-3/4" x wof. Always press toward the "solid" reading color so the seams will nestle when units are joined together.
 |
| Two strips cut 2-3/4" x wof. Off-set them by 2-1/2" as shown |
I selected 3 companion fabrics from the Knitty Sheep/Kitty Collection and the perfect blue from a Benartex batik.
I wanted to make 12 - 16 blocks, so I cut:
- 2 strips EACH of 4 colors: 2-3/4" x wof (will yield four blocks)
- 8 strips 2-3/4" x wof of the novelty print from Knitty Kitty/Sheep as shown above
From the Knitty Sheep novelty print (or any print), cut:
- Four strips 4" x 36/38". Take care to measure 1/4" from the tips of the sheep heads. This way you won't "intrude" on the heads in the next panel. Two strips are used for the quilt center and two are used for the side borders.
- Cut two wider borders from the two ends at the selvedges. Note that there is more of the gray background fabric on each of the ends. This makes them a natural for the top and bottom borders.
 |
| Use the ruler to cut perfect triangles, always aligning the ruler tip at the top of the strip set |
Flip flop the ruler across the strip set until you get to the end. Notice that by offsetting the strips as we did at the beginning, it allows us to get ONE MORE cut, thus enough for two blocks per strip set.
 |
| Squeezing one more cut from the strip set |
Let's see the block units:
 |
| 8 triangle cuts from each strip set, enough for 2 blocks |
And how did I arrange them?
 |
| Pretty nifty, huh? |
Pair two together and sew the two block halves:
 |
| Two block halves. Always press in the same direction |
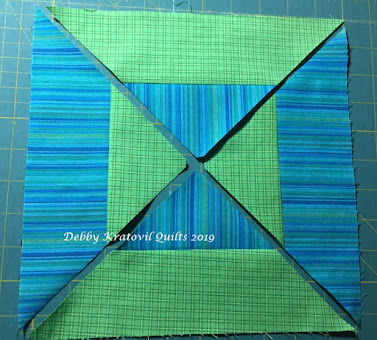
You need for the seams to go in opposite directions from each other, so always press toward the same center triangle. Then you press the center seam open to reduce bulk.
 |
| Hourglass block with center seam pressed open |
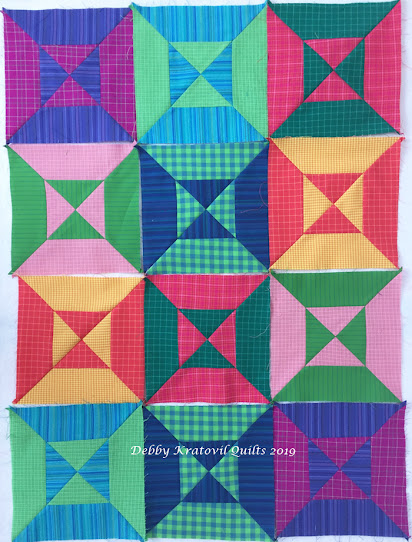
Now, can we see the other colors you used?
 |
| Four happy blocks in bright colors |
Now, let's see how you put the rows together. (Sorry. The lighting in my sewing studio is not good)
 |
| Rows of 4 blocks stitched together. Then joined to a horizontal sheep row. |
 |
| Don't you love these two sheep from Poland? And that awesome wool with crochet hook? |
 |
| Here are all the blocks and borders |
Because I didn't have the inches I needed to cover the entire length of the sides, I cut rectangles from the gray background companion print (like the one used in the blocks). The patches were the size of the side borders (4") and the top/bottom borders (5-1/4" - 6"). Worked perfectly!
Quilt Size: 43" x 44"
 |
| Love these colors. And aren't they such happy looking sheep? |
This is a very quick -and fun - block to make. And look at those Knitty Sheep in their rows. Love them all!
And now for the reveal!
 |
| Knitty Sheep Quilt (front, of course!) |
 |
| Knitty Sheep backed with cozy gray flannel |
I also used this technique using a woven plaid, also by Benartex. It's called Warp and Weft and here are some of the blocks (which I can't find in my studio!)
 |
| Hourglass Block using Warp and Weft |
And nine blocks which are lost here somewhere!
 |
| 9 Warp and Weft Hourglass blocks |
The Hourglass block is a great "go to" block that works well with just about any fabrics with good contrast.


What an adorable and fabulous little quilt! I, too, don't knit. My crochet is very limited now with carpel tunnel, sadly, but I used to love doing it - yarn and thread both. Those sheep are wonderful, too.
ReplyDelete