Tutorial for Sewing Baby Blocks
There's something about taking a class and asking the teacher a million questions, seeing thousands of samples (kidding), and generally discovering more than a pattern could ever tell you. Then, there's a printed pattern. A world of difference. I had a question about my Baby Blocks pattern yesterday and figured a few photos might help.
Baby Blocks is NOT for beginners, though it is fairly simple. It's those pesky triangle tips that keep getting misplaced, right? Remember, my technique is to split those white diamonds into 2-triangles for easy piecing.
 |
| Baby Blocks: 36" x 36" |
Here is a recent finish with some of my workshop samples. I made this with some sparkly fabrics! It's a little smaller than the one above. I ran out of fabric (what? it's never happened to you?)
 |
| Baby Blocks: 27" x 30" |
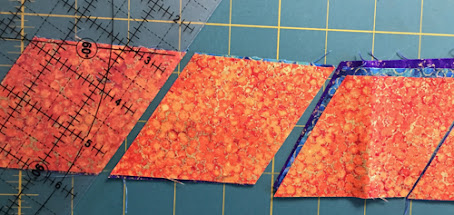
First, we cut the diamonds using our acrylic ruler with the 60 degree diagonal lines. Easy. They are measured from FLAT SIDE TO FLAT SIDE - NOT from point to point.
 |
| Diamonds cut from 2-1/2" strips |
Then we cut the 60 degree triangles. My patterns suggest using a 60 degree triangle ruler with a blunted tip. I always include templates for these, too. The ruler gets flip-flopped.
 |
| Cutting 60 degree triangles |
Then we have to cut the end triangles of each row. These are 30 degree triangles. Here I show cutting two from folded fabric. That set on the right will be trimmed. This is for my larger Baby Blocks pattern.
 |
| Cutting the row end triangles (30 degree) |
And how are they sewn? The diamonds and 60 degree triangles are sewn together in pairs before joining into vertical rows. This is how they are pinned. Because we use a blunted tip on those triangles, it is easy to join them with the diamonds. Note how the sides align!
 |
| Pinning the diamonds and triangles |
And how do they look when they are pressed (toward the triangle)? Perfectly aligned!
 |
| Pairs of triangle-diamonds |
I discovered that if I blunt my triangle on another tip, it makes for joining the neighboring pair of triangle-diamonds easy. What do I mean? Use the blunted tip of ruler to take off the tiny tip - it really does help!!
 |
| Trimming triangle tip for ease of seaming in the rows |
Here is a closeup of sewing a row together with several diamond-triangle units. No overhanging teeny triangle tips to guess about!
 |
| Aligning with ease |
Pinning and sewing two vertical rows - there's a LOT going on here. Take your time. These seams get pressed open.
 |
| Joining 2 vertical rows |
I sew two vertical rows of diamond-triangles together into the length I want and then it's time to finish off the top and bottom. This is where the 30 degree triangles come in. The blunted tip aligns with the flat side of that orange diamond. Stitch and press.
 |
| Sewing on first 30 degree end triangle |
And then the next one, which is the mirror image of the one you just sewed. That's why I cut these with the fabric folded, wrong sides together.
 |
| Do this at top and bottom of each double row |
Vertical rows. No y-seams. Rotary cutting patches. No funky size templates (tho you can use templates). Here is one of my students, Roberta, who made hers larger:
 |
| Roberta's Baby Blocks |
Take a visit to see more photos at my Etsy store. If you already have this pattern, revisit the photos above. This is how I teach my classes - lots and lots of steps and samples.
Small Baby Blocks - quilt is 36" x 36"; includes a pattern for table runner (26" x 46")
My Diamonds Have the Blues - 60" x 60"; includes a pattern for another quilt using leftover diamonds.


Oh, yes, I see what you mean by Roberta's quilt now. I read out of order, as I came to the e-mail notices. LOL Her quilt is fabulous! This will help when I come to putting the blocks together, and I see I will have to sew the block I'm embellishing differently. That helps a lot.
ReplyDelete