Here we are at Day Two with my second No Sneaky Peeky class sample. This hangs in my daughter's house. Actually, ALL of these quilts (including several of the Gee's Bend quilts) were quickly snatched up by my daughters.
First, a little mini quilt I made with scraps. Notice that the center is a square in a square (rather irregular) and then that serves as the center of an irregular Log Cabin. It was gifted to my daughter's friend. Notice the left side two-patch angled unit. That's what we're talking about today.
 |
| Improv mini |
My
No Sneaky Peeky sample before quilting:
These angled patches were used in the most difficult quilt to pattern of all 8 Gee's Bend quilts! This is
Strips and Strings by Mary Lee Bendolph. I honestly pulled my hair out with this, but I was actually able to pattern those slanted two-patch rectangles (not with curves, though!)
 |
| Strips and Strings by Mary Lee Bendolph: 49" x 74" |
And my interpretation:
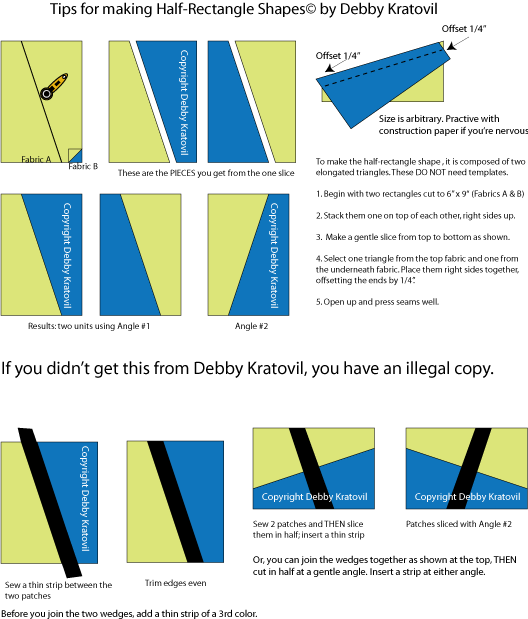
Let's look at these angled patches and how to make them.
Angled patches are made from 2 rectangles. Look at my sample above. You can see some of that angle business going on. Here are the steps we did in class. Cut two rectangles of fabric (any size, but I know some of you are nervous, so I'll give you a number: 6" x 9")
 |
| Two rectangles, each cut at a gentle angle - just do it. |
Then join the wedges. You do NOT use templates. Rulers are used so you get a straight cut. Don't cut from corner to corner. Measure in at least 1" or so from the corners.
 |
| Two colors, ready to be joined |
Sew randomly with other strips, both straight and angled.
Begin adding random strips on the opposite ends. Now you can continue to build your "block" as you wish, using either straight or irregular shaped pieces of fabric.
 |
| Strips added |
What follows is part of my worksheet from class. Notice that this is copyrighted. It is NOT to be printed and distributed. This is one page of my
15 page pdf pattern that includes all of my class notes, color illustrations, class exercises and prompts, sample blocks and info on making all sorts of improv units.
You can also insert a strip between the two patches. Or sew your two patches together, cut as shown above and THEN insert a strip. Getting any ideas yet? Is your fabric calling you?
Here it is shown in that No Sneaky Peeky sample above, now quilted. Notice the two angled strips that are inserted into the 2 and 3 patch units.
One more item for today. Two strips. Any size. Consider what you're going to attach them to. Sew them together:
 |
| Two strips (2" x 9" and 3" x 9") |
Cut a square (3-1/2"). Draw a diagonal line on wrong side. Stitch on that line. Trim, leaving 1/4".
 |
| Two strips with square. Sew on diagonal line |
Press. New unit!
 |
| Two strips with corner triangle |
One more thing on Log Cabins. Rita Mae Pettway's
Housetop Denim quilt is a Spiral Log Cabin. She started from the center and added logs of light and dark blue, swirling around the center. But, wait! What's that renegade red print square up at the top doing there? She certainly didn't run out of blue denim fabrics, did she?
 |
| Rita Mae Pettway's Housetop Denim: 84" x 70" |
This was unexpected - and brilliant! Puts a smile on your face, doesn't it?
And my interpretation:
That's it for today. Time to go play with your fabric. Yes, my work is simple but in order to encourage my students with some success, I started simple. It was so awesome to see what they came up with once they gave themselves "permission" to let anything go!
Tomorrow I will be featuring something NOT improv related because it's Windham Wednesday and I'm showing a new collection they sent me. But I'll resume with the improv stuff on Thursday and Friday.


Thanks
ReplyDelete